关于上一页与下一页实现细节

我想要把题库设计一下翻页功能,Mysql语句也很简单,在本地测试一点问题都没有,但是一放到服务器上便提示内存资源耗竭,最后在查看了一些资料后,在后面加了一个limit 1,如此便跑得飞快:

实现代码:

    public static function PrevQuestion($id,$uid=null,$testpaper=null)
    {
        $query = Question::find()->where(['<','id',$id]);

        if($uid)
        {
            $query->andWhere(['author'=>$uid]);
        }

        if($paper)
        {
            $query->LeftJoin('sq_testpaperinfo t','t.paper_id='.$paper_id);
        }

        $query->orderBy('id DESC');

        $query->limit(1);

        return $query->one();
    }

    public static function NextQuestion($id,$uid=null,$testpaper=null)
    {
        $query = Question::find()->where(['>','id',$id]);

        if($uid)
        {
            $query->andWhere(['author'=>$uid]);
        }

        if($paper)
        {
            $query->LeftJoin('sq_testpaperinfo t','t.paper_id='.$paper_id);
        }

        $query->orderBy('id DESC');
        $query->limit(1);

        return $query->one();
    }

下面是参考内容:

/**
* 获取当前记录的上一条记录
* @param seq
* @return
*/
@Select("select title, random_code from tb_blog where seq < ${seq} order by seq desc limit 1 ")
public Map<String,Object> getPreviousBlog(@Param("seq") long seq);

/**
* 获取当前记录的下一条记录
* @param seq
* @return
*/
@Select("select title, random_code from tb_blog where seq > ${seq} order by seq asc limit 1 ")
public Map<String,Object> getPostBlog(@Param("seq") long seq);

seq 是自增序列,random_code是id,title是博客标题。

seq不是主键,要使seq自增,先添加seq字段或建表时创建,再将seq添加unique索引,再使seq auto_increment,因为自增长列必须先是unique key或primary key。

php实现office文档转成pdf预览方法

$filetype = array(".docx",".doc",".xlsx",".xls",".pptx",".ppt",".jpg",".png",".pdf"); //文件类型
$tempFile = "/uploads/".$log["attachment"];                 //$log["attachment"]为文件地址;
$url = str_replace($filetype,"",$tempFile).".pdf";             //替换文件后缀
//header('Location: '.$url);
//die();
$tempFile = "/tmp/".basename($log["attachment"]);             //临时文件地址
copy("www.xxx.com/".$log["attachment"],$tempFile);             //移动文件
exec("unoconv -f pdf ".$tempFile);                           //文件转pdf
$pdf = str_replace($filetype,"",$tempFile).".pdf";           
header("Content-type:application/pdf");
// 文件将被称为 downloaded.pdf
//header("Content-Disposition:attachment;filename=downloaded.pdf");
// PDF 源在 original.pdf 中
readfile($pdf);
//$url = "/uploads/".$log["attachment"];
die();

原文链接:https://blog.csdn.net/leesin2011/article/details/53317362

PHP读取word文档里的文字及图片,并保存

一、composer安装phpWord

composer require phpoffice/phpword

传送门:https://packagist.org/packages/phpoffice/phpword

二、phpWord 读取 docx 文档(注意是docx格式,doc格式不行)

如果你的文件是doc格式,直接另存为一个docx就行了;如果你的doc文档较多,可以下一个批量转换工具:http://www.batchwork.com/en/doc2doc/download.htm

如果你还没配置自动加载,则先配置一下:

require ‘./vendor/autoload.php’;

加载文档:

$dir = str_replace('\', '/', DIR) . '/';
$source = $dir . 'test.docx';
$phpWord = \PhpOffice\PhpWord\IOFactory::load($source);

三、关键点

1)对齐方式:PhpOffice\PhpWord\Style\Paragraph -> getAlignment()

2)字体名称:\PhpOffice\PhpWord\Style\Font -> getName()

3)字体大小:\PhpOffice\PhpWord\Style\Font -> getSize()

4)是否加粗:\PhpOffice\PhpWord\Style\Font -> isBold()

5)读取图片:\PhpOffice\PhpWord\Element\Image -> getImageStringData()

6)ba64格式图片数据保存为图片:file_put_contents($imageSrc, base64_decode($imageData))

四、完整代码

 require './vendor/autoload.php';
 function docx2html($source)
 {
     $phpWord = \PhpOffice\PhpWord\IOFactory::load($source);
     $html = '';
     foreach ($phpWord->getSections() as $section) {
         foreach ($section->getElements() as $ele1) {
             $paragraphStyle = $ele1->getParagraphStyle();
             if ($paragraphStyle) {
                 $html .= '
             } else {
                 $html .= '
';             }             if ($ele1 instanceof \PhpOffice\PhpWord\Element\TextRun) {                 foreach ($ele1->getElements() as $ele2) {                     if ($ele2 instanceof \PhpOffice\PhpWord\Element\Text) {                         $style = $ele2->getFontStyle();                         $fontFamily = mb_convert_encoding($style->getName(), 'GBK', 'UTF-8');                         $fontSize = $style->getSize();                         $isBold = $style->isBold();                         $styleString = '';                         $fontFamily && $styleString .= "font-family:{$fontFamily};";                         $fontSize && $styleString .= "font-size:{$fontSize}px;";                         $isBold && $styleString .= "font-weight:bold;";                         $html .= sprintf('%s',                             $styleString,                             mb_convert_encoding($ele2->getText(), 'GBK', 'UTF-8')                         );                     } elseif ($ele2 instanceof \PhpOffice\PhpWord\Element\Image) {                         $imageSrc = 'images/' . md5($ele2->getSource()) . '.' . $ele2->getImageExtension();                         $imageData = $ele2->getImageStringData(true);                         // $imageData = 'data:' . $ele2->getImageType() . ';base64,' . $imageData;                         file_put_contents($imageSrc, base64_decode($imageData));                         $html .= '';                     }                 }             }             $html .= '
';
         }
     }
 return mb_convert_encoding($html, 'UTF-8', 'GBK');
 }
 $dir = str_replace('\', '/', DIR) . '/';
 $source = $dir . 'test.docx';
 echo docx2html($source);     

五、补充

很明显,这是一个简陋的word读取示例,只读取了段落的对齐方式,文字的字体、大小、是否加粗及图片等信息,其他例如文字颜色、行高。。。等等信息都忽悠了。需要的话,请自行查看phpWord源码,看\PhpOffice\PhpWord\Style\xxx 和 \PhpOffice\PhpWord\Element\xxx 等类里有什么读取方法就可以了

六、2020-07-21 补充

可以用以下方法直接获取到完整的html

$phpWord = \PhpOffice\PhpWord\IOFactory::load('xxx.docx');
$xmlWriter = \PhpOffice\PhpWord\IOFactory::createWriter($phpWord, "HTML");
$html = $xmlWriter->getContent();

注:html内容里包含了head部分,如果只需要style和body的话,需要自己处理一下;然后图片是base64的,要保存的话,也需要自己处理一下

base64数据保存为图片请参考上面代码

如果只想获取body里的内容,可以参考 \PhpOffice\PhpWord\Writer\HTML\Part\Body 里的 write 方法
复制代码

$phpWord = \PhpOffice\PhpWord\IOFactory::load('xxxx.docx');
$htmlWriter = \PhpOffice\PhpWord\IOFactory::createWriter($phpWord, "HTML");
$content = '';
foreach ($phpWord->getSections() as $section) {
$writer = new \PhpOffice\PhpWord\Writer\HTML\Element\Container($htmlWriter, $section);
$content .= $writer->write();
}
echo $content;exit;

图片的处理的话,暂时没有好办法能在不修改源码的情况下处理好,改源码的话,相关代码在 \PhpOffice\PhpWord\Writer\HTML\Element\Image 里

public function write()
 {
     if (!$this->element instanceof ImageElement) {
         return '';
     }
     $content = '';
     $imageData = $this->element->getImageStringData(true);
     if ($imageData !== null) {
         $styleWriter = new ImageStyleWriter($this->element->getStyle());
         $style = $styleWriter->write();
         // $imageData = 'data:' . $this->element->getImageType() . ';base64,' . $imageData;
         $imageSrc = 'images/' . md5($this->element->getSource()) . '.' . $this->element->getImageExtension();
         // 这里可以自己处理,上传oss之类的
         file_put_contents($imageSrc, base64_decode($imageData));
     $content .= $this->writeOpening();     $content .= "<img border=\"0\" style=\"{$style}\" src=\"{$imageSrc}\"/>";     $content .= $this->writeClosing(); } return $content;
 }

使用Phpword实现word转html

//Word转HTML
$phpWord = \PhpOffice\PhpWord\IOFactory::load('./word/hello.docx');
$xmlWriter = \PhpOffice\PhpWord\IOFactory::createWriter($phpWord, "HTML");
$xmlWriter->save('./html/hello.html'); 

Mathpix收费了?快使用API吧,个月免费识别1000次!

最近,数学公式OCR神器Mathpix 开始收费,一个月只能免费用50次,再用就得5刀一月,小伙伴们顿时叫苦不迭。想想这种套路国内互联网公司不知道玩了多少次了,从滴滴打车到美团外卖再到共享单车,都是先培养消费习惯再收割一波韭菜。但是当初大家都只顾享受免费识别公式带来的快感,哪知由俭入奢易,由奢入俭难,现在再手敲公式真是痛苦不堪。

目前来看,由于需要联网识别,基本没有空子可钻。当然也不排除个别神人用大量邮箱来白嫖:如何看待 Mathpix 收费?​www.zhihu.com

但是,Mathpix官网对于一些有能力的开发者还是开了一扇后门的:Mathpix OCR​mathpix.com

从它提供的OCR API来看,一个月可以免费使用1000次!在之后一直到10万次都是0.004美元(约合0.028元)一次。对个人使用者而言,1000次已经基本够了。

首先需要登录平台:MathpixOCR login​dashboard.mathpix.com

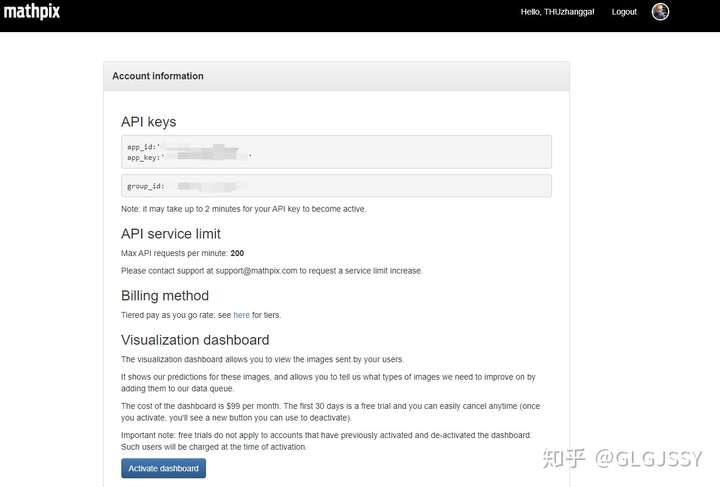
登录之后需要输入信用卡信息,完成账号激活。

激活后,将会显示API的id和key:

API官方文档:Mathpix API v3 Reference​docs.mathpix.com

Github上给出了具体示例:Mathpix/api-examples​github.com

以Python为例,只需要在mathpix.py中填写自己的id和key,再调用simple.py就能运行。从示例来看,它识别的是本地图片。我在它的基础上加入了识别剪贴板的代码,从而达成与Mathpix相似度为99%的使用体验。

import os
import base64
import requests
import json
from PIL import ImageGrab
#
# Common module for calling Mathpix OCR service from Python.
#
# N.B.: Set your credentials in environment variables APP_ID and APP_KEY,
# either once via setenv or on the command line as in
# APP_ID=my-id APP_KEY=my-key python3 simple.py 
#

env = os.environ

default_headers = {
    'app_id': env.get('APP_ID', '你的id'),
    'app_key': env.get('APP_KEY', '你的key'),
    'Content-type': 'application/json'
}

service = 'https://api.mathpix.com/v3/latex'

#
# Return the base64 encoding of an image with the given filename.
#
def image_uri(filename):
    image_data = open(filename, "rb").read()
    return "data:image/jpg;base64," + base64.b64encode(image_data).decode()

#
# Call the Mathpix service with the given arguments, headers, and timeout.
#
def latex(args, headers=default_headers, timeout=30):
    r = requests.post(service,
        data=json.dumps(args), headers=headers, timeout=timeout)
    return json.loads(r.text)


def mathpix_clipboard(): # 识别剪贴板公式
    im = ImageGrab.grabclipboard()
    im.save('equa.png','PNG')
    r = latex({
        'src': image_uri("equa.png"),
        'formats': ['latex_simplified']
    })
    print(r['latex_simplified'])

if __name__ == '__main__':
    mathpix_clipboard()
    

PHP操作Excel

安装

composer require phpoffice/phpspreadsheet

简单使用

use PhpOffice\PhpSpreadsheet\Spreadsheet;
use PhpOffice\PhpSpreadsheet\Writer\Xlsx;

$spreadsheet = new Spreadsheet();

for($i=1;$i<=3;$i++)
{
        if($i > 1)
        {
                $sheet = $spreadsheet->createSheet();
        }
        $spreadsheet->setActiveSheetIndex($i-1);
        $sheet = $spreadsheet->getActiveSheet();
        $sheet->setTitle('sheet_sheet'.$i);
        $sheet->setCellValue('A1', 'Hello World !'.$i);
}


$writer = new Xlsx($spreadsheet);
$writer->save('./public/hello world.xlsx');

基于PSCWS4词库的PHP中文分词工具

基于PSCWS4的PHP中文分词工具词库官方网址:http://www.xunsearch.com/scws/

这是用纯 PHP 代码实现的 C 版 Libscws 的全部功能,即第四版的 PSCWSPSCWS4

使用文档:http://www.xunsearch.com/scws/docs.php#pscws4

安装composer require wxkxklmyt/pscws

安装

composer require wxkxklmyt/pscws4

使用

    /**
     * SCWS中文分词
     *
     * @param string $text 分词字符串
     * @param number $number 权重高的词数量(默认5个)
     * @param string $type 返回类型,默认字符串
     * @param string $delimiter 分隔符
     * @return string|array 字符串|数组
     */
    $scws = new Scws();
    $scws -> scws('能做到柔和、善解、忍辱,才有办法与人结好缘。——证严法师《静思语》');

运行结果

静思 善解 法师 柔和 做到

其它说明

  1. 默认返回结果为字符串,返回字符串支持自定义分隔符,默认为空格
  2. 支持返回结果为数组
  3. 支持返回词数量自定义,默认为5个

mpdf7 中文乱码 解决办法

<?php
require_once './vendor/autoload.php';
//report errors
error_reporting(E_ALL);
ini_set("display_errors", 1);

$config = [
    'mode' => '+aCJK', 
    // "allowCJKoverflow" => true, 
    "autoScriptToLang" => true,
    // "allow_charset_conversion" => false,
    "autoLangToFont" => true,
];
$mpdf=new \Mpdf\Mpdf($config);

$mpdf->WriteHTML('Hello World 中文');
$mpdf->Output();