关于上一页与下一页实现细节

我想要把题库设计一下翻页功能,Mysql语句也很简单,在本地测试一点问题都没有,但是一放到服务器上便提示内存资源耗竭,最后在查看了一些资料后,在后面加了一个limit 1,如此便跑得飞快:

实现代码:

    public static function PrevQuestion($id,$uid=null,$testpaper=null)
    {
        $query = Question::find()->where(['<','id',$id]);

        if($uid)
        {
            $query->andWhere(['author'=>$uid]);
        }

        if($paper)
        {
            $query->LeftJoin('sq_testpaperinfo t','t.paper_id='.$paper_id);
        }

        $query->orderBy('id DESC');

        $query->limit(1);

        return $query->one();
    }

    public static function NextQuestion($id,$uid=null,$testpaper=null)
    {
        $query = Question::find()->where(['>','id',$id]);

        if($uid)
        {
            $query->andWhere(['author'=>$uid]);
        }

        if($paper)
        {
            $query->LeftJoin('sq_testpaperinfo t','t.paper_id='.$paper_id);
        }

        $query->orderBy('id DESC');
        $query->limit(1);

        return $query->one();
    }

下面是参考内容:

/**
* 获取当前记录的上一条记录
* @param seq
* @return
*/
@Select("select title, random_code from tb_blog where seq < ${seq} order by seq desc limit 1 ")
public Map<String,Object> getPreviousBlog(@Param("seq") long seq);

/**
* 获取当前记录的下一条记录
* @param seq
* @return
*/
@Select("select title, random_code from tb_blog where seq > ${seq} order by seq asc limit 1 ")
public Map<String,Object> getPostBlog(@Param("seq") long seq);

seq 是自增序列,random_code是id,title是博客标题。

seq不是主键,要使seq自增,先添加seq字段或建表时创建,再将seq添加unique索引,再使seq auto_increment,因为自增长列必须先是unique key或primary key。

python爬取试题信息-保存文本并利用正则表达式获取指定字段并保存mysql数据库

原文链接:https://blog.csdn.net/weixin_44648900/article/details/105196981

疫情期间无聊突发奇想想要做一个在线考试系统,目前已完成数据库设计,开始编写爬虫爬取试题数据,目标网站如下,获取内容包括:考点,试题,答案选项,答案,解析。考点字段的获取便于以后系统个性化推荐的需要。🚔

在这里插入图片描述
在这里插入图片描述

去除网页里获取时候遇到的脏数据

查看网页的时候发现这个东西,可能是他们后台有其他用途,由于直接匹配字段不方便,先把所有网页文本先获取再把class为this_jammer等中内容获取为停用词表,爬取的试题文本去掉这些脏数据就OK了。

在这里插入图片描述

下面保存脏数据表的函数

在这里插入图片描述
#-*-coding:utf-8-*-
import requests
from bs4 import BeautifulSoup
# import codecs
def get_url(target_url, server, headers):
    req = requests.get(target_url, headers=headers)
    bf = BeautifulSoup(req.text)
    div = bf.find_all('div', class_='questions_col')
    a_bf = BeautifulSoup(str(div[0]))
    a = a_bf.find_all('a')
    cheak_parsing_url = []
    for each in a:
        if each.string == "查看解析":
            full_url = server + each.get('href')
            cheak_parsing_url.append(full_url)
    print(cheak_parsing_url)
    return cheak_parsing_url

def change_page(target_url, server, headers):
    req = requests.get(target_url, headers=headers)
    bf = BeautifulSoup(req.text)
    div = bf.find_all('div', class_='fenye')
    a_bf = BeautifulSoup(str(div[0]))
    a = a_bf.find_all('a')
    full_url = None
    for each in a:
        if each.string == "下一页":
            full_url = server + each.get('href')
            print(full_url)
        else :
            continue
    return full_url

def get_html(url_list, file_path, headers):
    for url in url_list:
        req = requests.get(url, headers=headers)
        content = req.content.decode('utf-8','ignore')
        bf = BeautifulSoup(content, fromEncoding="gb18030")
        del_text = bf.find_all(class_=["this_jammer", "hidejammersa", "jammerd42"])
        for i in del_text:
            if i:
                new_tag = ""
                try:
                    i.string.replace_with(new_tag)
                except:
                    pass
        texts = bf.find_all('div', class_= 'answer_detail')
        try:
            texts = texts[0].text.replace('\xa0', '')
            texts = texts.replace(" ", "")
        except:
            pass
        try:
            texts = texts.replace("\n", '')
        except:
            pass
        print(texts)
        contents_save(file_path, texts)

def contents_save(file_path, content):
    """
    :param file_path: 爬取文件保存路径
    :param content: 爬取文本文件内容
    :return: None
    """
    with open(file_path, 'a', encoding="utf-8", errors='ignore') as f:
        try:
            f.write(content)
        except:
            pass
        f.write('\n')

def get_category(target_url, server, headers):
    req = requests.get(target_url, headers=headers)
    bf = BeautifulSoup(req.text)
    div = bf.find_all('div', class_='shiti_catagory frame')
    a_bf = BeautifulSoup(str(div[0]))
    a = a_bf.find_all('a')
    category = []
    for each in a:
        full_url = server + each.get('href')
        category.append(full_url)
    print(category)
    return category

if __name__ == "__main__":
    main_url = "https://tiku.21cnjy.com/tiku.php?mod=quest&channel=8&xd=3"
    server = "https://tiku.21cnjy.com/"
    save_dir = "/Users/lidongliang/Desktop/爬虫/data"
    subject_file = "1.txt"
    file_path = save_dir + '/' + subject_file
    headers = {
        'User-Agent': 'Mozilla/5.0 (Macintosh; Intel Mac OS X 10_15_1) AppleWebKit/537.36 (KHTML, like Gecko) Chrome/80.0.3987.132 Safari/537.36',
        'Accept-Encoding': 'gzip'}
    categorys = get_category(main_url, server, headers)
    for category_url in categorys:
        counting = 0
        target_url = category_url
        while counting < 100:
            cheak_parsing_url = get_url(target_url, server, headers)
            get_html(cheak_parsing_url, file_path, headers)
            target_url = change_page(target_url, server, headers)

            if target_url == None:
                break
            counting += 1

运行初步结果如下:

在这里插入图片描述

对文本进行正则匹配获取文本指定字段并保存到数据库

import re
import pymysql

w1 = 'A.'
w2 = 'B.'
w3 = 'C.'
w4 = 'D.'
w5 = '答案'
w6 = '解析试题分析:'
w7 = '考点'


def get_txt():
    with open("/Users/lidongliang/Desktop/爬虫/data/1.txt", "r") as f:
        txt = f.readlines()
        return txt


def fen(txt):
    # buff = txt.replace('\n','')
    timu = re.compile('^' + '(.*?)' + w1, re.S).findall(txt)
    A = re.compile(w1 + '(.*?)' + w2, re.S).findall(txt)
    B = re.compile(w2 + '(.*?)' + w3, re.S).findall(txt)
    C = re.compile(w3 + '(.*?)' + w4, re.S).findall(txt)
    D = re.compile(w4 + '(.*?)' + w5, re.S).findall(txt)
    daan = re.compile(w5 + '(.*?)' + w6, re.S).findall(txt)
    jiexi = re.compile(w6 + '(.*?)' + w7, re.S).findall(txt)
    kaodian = re.compile(w7 + '(.*?)' + '\Z', re.S).findall(txt)

    timu.extend(A)
    timu.extend(B)
    timu.extend(C)
    timu.extend(D)
    timu.extend(daan)
    timu.extend(jiexi)
    timu.extend(kaodian)

    # print(timu)

    try:
        tg = timu[0]
        xx = ("A:" + timu[1] + "B:" + timu[2] + "C:" + timu[3] + "D:" + timu[4])
        da = timu[5]
        fx = timu[6]
        kd = timu[7]
    except:
        tg = '1'
        xx = '1'
        da = '1'
        fx = '1'
        kd = '1'
    con = pymysql.connect(host='localhost', user='root', passwd='00000000', db='login_test_1', charset='utf8')
    cursor = con.cursor()
    sql = "insert into question_info(tg,xx,da,fx,kd) values('%s','%s','%s','%s','%s')" \
          % (tg, xx, da, fx, kd)
    cursor.execute(sql)
    con.commit()


if __name__ == "__main__":
    txt = get_txt()
    for i in txt:
        fen(i)
    print("done")

最后结果:

在这里插入图片描述

正则提取选项偶遇

<li class="list-group-item"><b>题文:</b>  4.已知某扇形的面积为<img src="/upload/word/57680275bcf0b6a839384c6480e0af36.png" style="height:auto">,若该扇形的半径<img src="/upload/word/d452629594b058b78eba1fe55eb3b5ac.png" style="height:auto">,弧长<img src="/upload/word/57b4da4d396ff14b1f76cd9c2d3b6254.png" style="height:auto">满足<img src="/upload/word/4e57454c31274c7e38b4450fcc89e3b1.png" style="height:auto">,则该扇形圆心角大小的弧度数是()
A.<img src="/upload/word/9d27aaaad550b71d8366a1dbc4f3fedA.png" style="height:auto"/>
B.<img src="/upload/word/80a9d43aae805fdd22361a7020614342.png" style="height:auto"/>
C.<img src="/upload/word/8ca1d7a7c4e997025fb882e90977f37b.png" style="height:auto"/>
D.<img src="/upload/word/9d27aaaad550b71d8366a1dbc4f3feda.png" style="height:auto"/>或<img src="/upload/word/80a9d43aae805fdd22361a7020614342.png" style="height:auto"/></li>

使用的正则表达示如下:

$pattern_options = "~(.*)A\.(.*)B\.(.*)C\.(.*)D\.(.*)~Si";		    
preg_match_all($pattern_options, $items[5][0], $option_matches);
$content = $option_matches[1][0];

但这个正则不能正确类似A选项中重复”A.”的问题,到底应该怎么写这个正则,才能正确匹配呢?

python 解析docx文档的方法,以及利用Python从docx文档提取插入的文本对象和图片

首先安装docx模块,通过pip install docx或者在docx官方链接上下载安装都可以

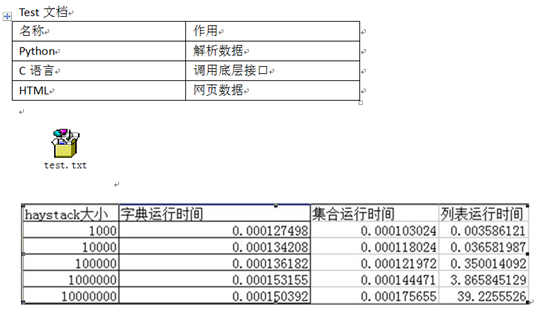
下面来看下如何解析docx文档:文档格式如下

有3个部分组成 1 正文:text文档 2 一个表格。 3一个插入的文件对象。4 一个图片 这4个部分是我们在docx文档中最常见的几种格式。解析代码如下

import docx

def docx_try():
    doc=docx.Document(r'E:\py_prj\test.docx')
    for p in doc.paragraphs:
        print p.text
    for t in doc.tables:
        for r in t.rows:
            for c in r.cells:
                print c.text

E:\python2.7.11\python.exe E:/py_prj/test3.py

Test文档

名称

作用

Python

解析数据

C语言

调用底层接口

HTML

网页数据

首先是用docx.Document打开对应的文件目录。docx文件的结构比较复杂,分为三层,1、Docment对象表示整个文档;2、Docment包含了Paragraph对象的列表,Paragraph对象用来表示文档中的段落;3、一个Paragraph对象包含Run对象的列表。 因此p.text会打印出整个的文本文档。而用doc.tables来遍历所有的表格。并且对每个表格通过遍历行,列的方式来得到所有的内容。

但是在运行结果中并没有找到我们插入的文件对象和图片,text.txt文档。这部分该如何解析呢。首先我们需要先来认识下docx文档的格式组成:

docx是Microsoft Office2007之后版本使用的,用新的基于XML的压缩文件格式取代了其目前专有的默认文件格式,在传统的文件名扩展名后面添加了字母“x”(即“.docx”取代“.doc”、“.xlsx”取代“.xls”、“.pptx”取代“.ppt”)。

docx格式的文件本质上是一个ZIP文件。将一个docx文件的后缀改为ZIP后是可以用解压工具打开或是解压的。事实上,Word2007的基本文件就是ZIP格式的,他可以算作是docx文件的容器。

docx 格式文件的主要内容是保存为XML格式的,但文件并非直接保存于磁盘。它是保存在一个ZIP文件中,然后取扩展名为docx。将.docx 格式的文件后缀改为ZIP后解压, 可以看到解压出来的文件夹中有word这样一个文件夹,它包含了Word文档的大部分内容。而其中的document.xml文件则包含了文档的主要文本内容

从上面的文档我们可以了解到docx文档实际上是由XML文档打包组成的。那么我们要得到其中所有的部分,可以用ZIP解压的方式来得到所有的部件。我们先试下看是否可以

1 将docx文档改成ZIP的后缀

2 解压文件

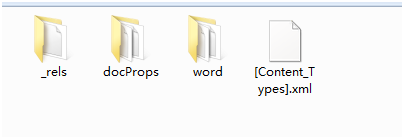
解压之后得到如下几个文件

点开word文件夹:有如下的文件夹。document.xml就是描述文本对象的文件

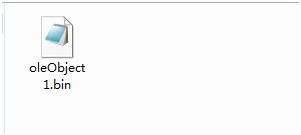
其中embeddings文件中就是我们插入的文本对象text.txt. 是一个bin文件

Media文件中就是存储的图片:

我们通过手动的方式将插入的文本以及图片解析出来,那么通过代码也是同样可以解析的。代码如下。

os.chdir(r'E:\py_prj')  #首先改变目录到文件的目录
os.rename('test.docx','test.ZIP')  # 重命名为zip文件
f=zipfile.ZipFile('test.zip','r')  #进行解压
for file in f.namelist():
    f.extract(file)
file=open(r'E:\py_prj\word\embeddings\oleObject1.bin','rb').read() #进入文件路径,读取二进制文件。
for f in file:
    print f


通过上面的方式,就可以将docx中插入的文件以及图片全部解析出来。具体docx的写的方式可以参考官方文档的介绍

php实现office文档转成pdf预览方法

$filetype = array(".docx",".doc",".xlsx",".xls",".pptx",".ppt",".jpg",".png",".pdf"); //文件类型
$tempFile = "/uploads/".$log["attachment"];                 //$log["attachment"]为文件地址;
$url = str_replace($filetype,"",$tempFile).".pdf";             //替换文件后缀
//header('Location: '.$url);
//die();
$tempFile = "/tmp/".basename($log["attachment"]);             //临时文件地址
copy("www.xxx.com/".$log["attachment"],$tempFile);             //移动文件
exec("unoconv -f pdf ".$tempFile);                           //文件转pdf
$pdf = str_replace($filetype,"",$tempFile).".pdf";           
header("Content-type:application/pdf");
// 文件将被称为 downloaded.pdf
//header("Content-Disposition:attachment;filename=downloaded.pdf");
// PDF 源在 original.pdf 中
readfile($pdf);
//$url = "/uploads/".$log["attachment"];
die();

原文链接:https://blog.csdn.net/leesin2011/article/details/53317362

使用phpword获取doc中的表格数据

1. 首先确定使用phpword是可以读取word文档中表格里面的数据, 使用的phpword版本0.17.0

1composer require "phpoffice/phpword"

2.关键词及包含原理 (这里只做简单概述)

本人做博文喜欢直接贴代码,直接用。可这个不太行啊,因为输入不统一,word格式样式太多,输出也不统一,有的要输出数据,有的要输出word或者html,所以这里就追一下原理(可能不严谨但是便于理解)

关键词

section(部分) : phpword中将word文档分为若干个section(部分)

element(元素) : 每个section包含若干个element(元素)、文本、图片,元素分为文本元素、表格元素、其他(未涉及不做讨论)

textRun(文本元素) : 每个文本集合包含多个文本

text(文本) : 为字符或者图片

table(表格元素) : 每个表格元素包含多个行 row

row(行) : 每个行包含多个列 cell

cell(列) : 每个列包含多个textRun(文本元素) 这里没错,就是包含多个文本元素(表格元素也可以但是没人在word表格的某一个格里再来一个表格吧)

各个节点之间的关系图

3.代码实现(本地测试已通)

<?php
/**
 * Created by PhpStorm.
 * User: parker
 * Date: 2020/10/18
 * Time: 16:09
 */

namespace common\services;


class WordService extends BaseService
{

    public static function importWord($info)
    {
        $word  = self::getWord($info['path']);
        dd($word);
    }

    /**
     * 获取word文档内容
     * @param string $path
     * @return array
     */
    public static function getWord($path = '')
    {
        //加载word文档,使用phpword处理
        $phpWord = \PhpOffice\PhpWord\IOFactory::load($path);
        return self::getNodeContent($phpWord);
    }

    /**
     * 根据word主节点获取分节点内容
     * @param $word
     * @return array
     */
    public static function getNodeContent($word)
    {
        $return = [];
        //分解部分
        foreach ($word->getSections() as $section)
        {
            if ($section instanceof \PhpOffice\PhpWord\Element\Section) {
                //分解元素
                foreach ($section->getElements() as $element)
                {
                    //文本元素
                    if ($element instanceof \PhpOffice\PhpWord\Element\TextRun) {
                        $text = '';
                        foreach ($element->getElements() as $ele) {
                            $text .= self::getTextNode($ele);
                        }
                        $return[] = $text;
                    }
                    //表格元素
                    else if ($element instanceof \PhpOffice\PhpWord\Element\Table) {
                        foreach ($element->getRows() as $ele)
                        {
                            $return[] = self::getTableNode($ele);
                        }
                    }
                }
            }
        }
        return $return;
    }

    /**
     * 获取文档节点内容
     * @param $node
     * @return string
     */
    public static function getTextNode($node)
    {
        $return = '';
        //处理文本
        if ($node instanceof \PhpOffice\PhpWord\Element\Text)
        {
            $return .= $node->getText();
        }
        //处理图片
        else if ($node instanceof \PhpOffice\PhpWord\Element\Image)
        {
            $return .= self::pic2text($node);
        }
        //处理文本元素
        else if ($node instanceof \PhpOffice\PhpWord\Element\TextRun) {
            foreach ($node->getElements() as $ele) {
                $return .= self::getTextNode($ele);
            }
        }
        return $return;
    }

    /**
     * 获取表格节点内容
     * @param $node
     * @return string
     */
    public static function getTableNode($node)
    {
        $return = '';
        //处理行
        if ($node instanceof \PhpOffice\PhpWord\Element\Row) {
            foreach ($node->getCells() as $ele)
            {
                $return .= self::getTableNode($ele);
            }
        }
        //处理列
        else if ($node instanceof \PhpOffice\PhpWord\Element\Cell) {
            foreach ($node->getElements() as $ele)
            {
                $return .= self::getTextNode($ele);
            }
        }
        return $return;
    }

    /**
     * 处理word文档中base64格式图片
     * @param $node
     * @return string
     */
    public static function pic2text($node)
    {
        //获取图片编码
        $imageData = $node->getImageStringData(true);
        //添加图片html显示标头
        $imageData = 'data:' . $node->getImageType() . ';base64,' . $imageData;
        $return = '<img src="'.$imageData.'">';
        return $return;
    }
    /**
     * 处理word文档中base64格式图片
     * @param $node
     * @return string
     */
    public static function pic2file($node)
    {
        //图片地址(一般为word文档地址+在word中的锚点位置)
        $imageSrc  = 'images/' . md5($node->getSource()) . '.' . $node->getImageExtension();
        $imageData = $node->getImageStringData(true);
        //将图片保存在本地
        file_put_contents($imageSrc, base64_decode($imageData));
        return $imageSrc;
    }

    /**
     * 将word转化为html(转换存储html文件后展示)
     * @param $path
     * @throws \PhpOffice\PhpWord\Exception\Exception
     */
    public static function word2html($path)
    {
        $phpWord = FileImportService::getOne($path);
        //转为html处理
        $xmlWriter  = \PhpOffice\PhpWord\IOFactory::createWriter($phpWord, "HTML");
        $path = pathinfo($path);
        $fileName = $path['dirname'] . '/' . $path['filename'] . '.html';
        $xmlWriter->save($fileName);
        $html = file_get_contents($fileName);
        echo $html;
        die;

    }


}

关于word模板导入中OLEObject的二进制文件转图片的方法

很久以前就想要做这个事情,但时间不允许,当然更多的是技术不行,总期待着有现成的解决方案,当然现成的PHPWord可以解决很多事情,但还是遇到的新的问题,如下:

【题文】1.集合<Object: word/embeddings/oleObject1.bin>,<Object: word/embeddings/oleObject2.bin>,则<Object: word/embeddings/oleObject3.bin>( )。A、<Object: word/embeddings/oleObject4.bin>B、<Object: word/embeddings/oleObject5.bin>C、<Object: word/embeddings/oleObject6.bin>D、<Object: word/embeddings/oleObject7.bin>【答案】B【解析】∵<Object: word/embeddings/oleObject8.bin>,∴<Object: word/embeddings/oleObject9.bin>,∵<Object: word/embeddings/oleObject10.bin>,故选B。【结束】

上面是读取word的一种情形,所以就考虑把word文档中的公式都变成图片。

下面是探寻到的方法:

第一步:把word保存为html格式

第二步:用word(或WPS)重新打开html文件,并保存为docx格式文件

经过上面两步就实现了利用Mathtype等公式编辑器编辑的公式转图片的效果,非常好,现在可以读取了,但新的问题又来了,有些公式是利用word直接插入的公式,现在已经变形了!!!,呜呜呜……


今天查寻资料得知应该可能使用Apache POI解决这个文件读取的问题,但可惜是基于java的

地址:https://blog.csdn.net/qianhuan_/article/details/110197907

yii跨域处理_Yii2下session跨域名共存的解决方案

本文转自:https://blog.csdn.net/weixin_29130369/article/details/111922231?utm_medium=distribute.pc_relevant.none-task-blog-baidujs_title-2&spm=1001.2101.3001.4242

前面谈过session相关配置,在开发的时候,常需要跨域共用session的是登录模块,我相信很多开发的朋友的都遇到过,只需要一个地方登录,相关联的网站也是处于登录状态。两种情况:一种9streets.cn和a.9streets.cn之间,另一种是a.com b.com之间,这几天总结了一下处理方法。

无论是一二级域名,和不同域名下的跨域,无非要达到两点:

客户端访问同一个sessionId,

所有域名对应的服务器访问的session的数据的位置必须一致。

1.访问共同的sessionId主要是通过把当前的sessionId写进cookie里面

cookie在不同域名下是不能访问的,我们需要在访问在后台设置用户在登录的时候,把需要共用的登录信息的域名,如果是在1,2级域名下,直接把cookie设置为所属主域名,例如:

setcookie(“session_id”,session_id(),time()+3600*24*365*10,”/”,”.a.com”);

也许你会问:如果是在不同的域名呢?采用P3P技术简单解决,实现原理,在访问网站x.com的时候,y.com程序触发y.com文件的写入sessionid值,sessionid值便可以获取,然后把seesion值存入数据库,取相同的sessionid值便可。这就要求y.com里面的程序文件必需能跨域访问,默认情况下,浏览器是不能跨域设置cookie的,加上p3p头后才行。在对应php文件加上:header(‘P3P: CP=”CURa ADMa DEVa PSAo PSDo OUR BUS UNI PUR INT DEM STA PRE COM NAV OTC NOI DSP COR”‘);

2.session数据存储位置一致的实现方法

session该数据默认情况下是存放在服务器的tmp文件下的,是以文件形式存在,而非存储在服务器的内存中,在这里我们得修改为所有域下都能访问的方式。网上介绍了数据库存储,文件形式存储,内存存储, 如果用数据库存储session数据,网站的访问量很大的话,SESSION 的读写会频繁地对数据库进行操作,效率就会明显降低,可以考虑存在内存服务器来实现,下面的session.rar里面介绍的是数据库存session的实例。

在yii2下 处理这中问题,根据网上搜到的教程 终配置成功教程如下:

$host = explode('.', $_SERVER["HTTP_HOST"]);
if (count($host) > 2) {
	define('DOMAIN', $host[1] . '.' . $host[2]);
} else {
	define('DOMAIN', $host[0] . '.' . $host[1]);
}
define('DOMAIN_HOME', 'www.' . DOMAIN);
define('DOMAIN_USER_CENTER', 'man.' . DOMAIN);
define('DOMAIN_API', 'api.' . DOMAIN);
define('DOMAIN_EMAIL', 'mail.' . DOMAIN);
define('DOMAIN_LOGIN', 'login.' . DOMAIN);
define('DOMAIN_IMG', 'img.' . DOMAIN);

然后配置User 和 Session:

'user' => [
'enableAutoLogin' => true,
'identityCookie' => ['name' => '_identity', 'httpOnly' => true, 'domain' => '.' . DOMAIN],
],
'session' => [
     'cookieParams' => ['domain' => '.' . DOMAIN, 'lifetime' => 0],
     'timeout' => 3600,
],

这里在配置项的user和session里 我把domain写死了例如:’domain’=>’.baidu.com’,这样就不用判断了.

以上就是本文的全部内容,希望对大家的学习有所帮助,也希望大家多多支持脚本之家。

PHP读取word文档里的文字及图片,并保存

一、composer安装phpWord

composer require phpoffice/phpword

传送门:https://packagist.org/packages/phpoffice/phpword

二、phpWord 读取 docx 文档(注意是docx格式,doc格式不行)

如果你的文件是doc格式,直接另存为一个docx就行了;如果你的doc文档较多,可以下一个批量转换工具:http://www.batchwork.com/en/doc2doc/download.htm

如果你还没配置自动加载,则先配置一下:

require ‘./vendor/autoload.php’;

加载文档:

$dir = str_replace('\', '/', DIR) . '/';
$source = $dir . 'test.docx';
$phpWord = \PhpOffice\PhpWord\IOFactory::load($source);

三、关键点

1)对齐方式:PhpOffice\PhpWord\Style\Paragraph -> getAlignment()

2)字体名称:\PhpOffice\PhpWord\Style\Font -> getName()

3)字体大小:\PhpOffice\PhpWord\Style\Font -> getSize()

4)是否加粗:\PhpOffice\PhpWord\Style\Font -> isBold()

5)读取图片:\PhpOffice\PhpWord\Element\Image -> getImageStringData()

6)ba64格式图片数据保存为图片:file_put_contents($imageSrc, base64_decode($imageData))

四、完整代码

 require './vendor/autoload.php';
 function docx2html($source)
 {
     $phpWord = \PhpOffice\PhpWord\IOFactory::load($source);
     $html = '';
     foreach ($phpWord->getSections() as $section) {
         foreach ($section->getElements() as $ele1) {
             $paragraphStyle = $ele1->getParagraphStyle();
             if ($paragraphStyle) {
                 $html .= '
             } else {
                 $html .= '
';             }             if ($ele1 instanceof \PhpOffice\PhpWord\Element\TextRun) {                 foreach ($ele1->getElements() as $ele2) {                     if ($ele2 instanceof \PhpOffice\PhpWord\Element\Text) {                         $style = $ele2->getFontStyle();                         $fontFamily = mb_convert_encoding($style->getName(), 'GBK', 'UTF-8');                         $fontSize = $style->getSize();                         $isBold = $style->isBold();                         $styleString = '';                         $fontFamily && $styleString .= "font-family:{$fontFamily};";                         $fontSize && $styleString .= "font-size:{$fontSize}px;";                         $isBold && $styleString .= "font-weight:bold;";                         $html .= sprintf('%s',                             $styleString,                             mb_convert_encoding($ele2->getText(), 'GBK', 'UTF-8')                         );                     } elseif ($ele2 instanceof \PhpOffice\PhpWord\Element\Image) {                         $imageSrc = 'images/' . md5($ele2->getSource()) . '.' . $ele2->getImageExtension();                         $imageData = $ele2->getImageStringData(true);                         // $imageData = 'data:' . $ele2->getImageType() . ';base64,' . $imageData;                         file_put_contents($imageSrc, base64_decode($imageData));                         $html .= '';                     }                 }             }             $html .= '
';
         }
     }
 return mb_convert_encoding($html, 'UTF-8', 'GBK');
 }
 $dir = str_replace('\', '/', DIR) . '/';
 $source = $dir . 'test.docx';
 echo docx2html($source);     

五、补充

很明显,这是一个简陋的word读取示例,只读取了段落的对齐方式,文字的字体、大小、是否加粗及图片等信息,其他例如文字颜色、行高。。。等等信息都忽悠了。需要的话,请自行查看phpWord源码,看\PhpOffice\PhpWord\Style\xxx 和 \PhpOffice\PhpWord\Element\xxx 等类里有什么读取方法就可以了

六、2020-07-21 补充

可以用以下方法直接获取到完整的html

$phpWord = \PhpOffice\PhpWord\IOFactory::load('xxx.docx');
$xmlWriter = \PhpOffice\PhpWord\IOFactory::createWriter($phpWord, "HTML");
$html = $xmlWriter->getContent();

注:html内容里包含了head部分,如果只需要style和body的话,需要自己处理一下;然后图片是base64的,要保存的话,也需要自己处理一下

base64数据保存为图片请参考上面代码

如果只想获取body里的内容,可以参考 \PhpOffice\PhpWord\Writer\HTML\Part\Body 里的 write 方法
复制代码

$phpWord = \PhpOffice\PhpWord\IOFactory::load('xxxx.docx');
$htmlWriter = \PhpOffice\PhpWord\IOFactory::createWriter($phpWord, "HTML");
$content = '';
foreach ($phpWord->getSections() as $section) {
$writer = new \PhpOffice\PhpWord\Writer\HTML\Element\Container($htmlWriter, $section);
$content .= $writer->write();
}
echo $content;exit;

图片的处理的话,暂时没有好办法能在不修改源码的情况下处理好,改源码的话,相关代码在 \PhpOffice\PhpWord\Writer\HTML\Element\Image 里

public function write()
 {
     if (!$this->element instanceof ImageElement) {
         return '';
     }
     $content = '';
     $imageData = $this->element->getImageStringData(true);
     if ($imageData !== null) {
         $styleWriter = new ImageStyleWriter($this->element->getStyle());
         $style = $styleWriter->write();
         // $imageData = 'data:' . $this->element->getImageType() . ';base64,' . $imageData;
         $imageSrc = 'images/' . md5($this->element->getSource()) . '.' . $this->element->getImageExtension();
         // 这里可以自己处理,上传oss之类的
         file_put_contents($imageSrc, base64_decode($imageData));
     $content .= $this->writeOpening();     $content .= "<img border=\"0\" style=\"{$style}\" src=\"{$imageSrc}\"/>";     $content .= $this->writeClosing(); } return $content;
 }

Anaconda使用方法

1.创建新环境:

conda create --name <env_name> <package_names>

如:conda create -n python3 python=3.5 numpy pandas

2.切换环境:

activate <env_name>