
- 状态file文件待验证请创建fileauth.txt添加到如下指定位置,完成后:立即验证域名文件位置文件名文件内容/.well-known/pki-validation/fileauth.txt *******************fileauth.txt内容************************
- 文件核查http://blog.yuekegu.com/.well-known/pki-validation/fileauth.txt
- 证书类型TrustAsia TLS RSA CA(1年)
- 通用名称blog.yuekegu.com
- 提交时间2021/09/29 06:34:21
基于 PHP 和 word2vec 的简单分类器
基于 PHP 和 word2vec 的简单分类器,用于文章、新闻等内容自动分类,项目包含样本训练、识别代码,
分词组件用的是 PhpAnalysis,简单灵活。欢迎大家一起优化并完善。
项目地址:
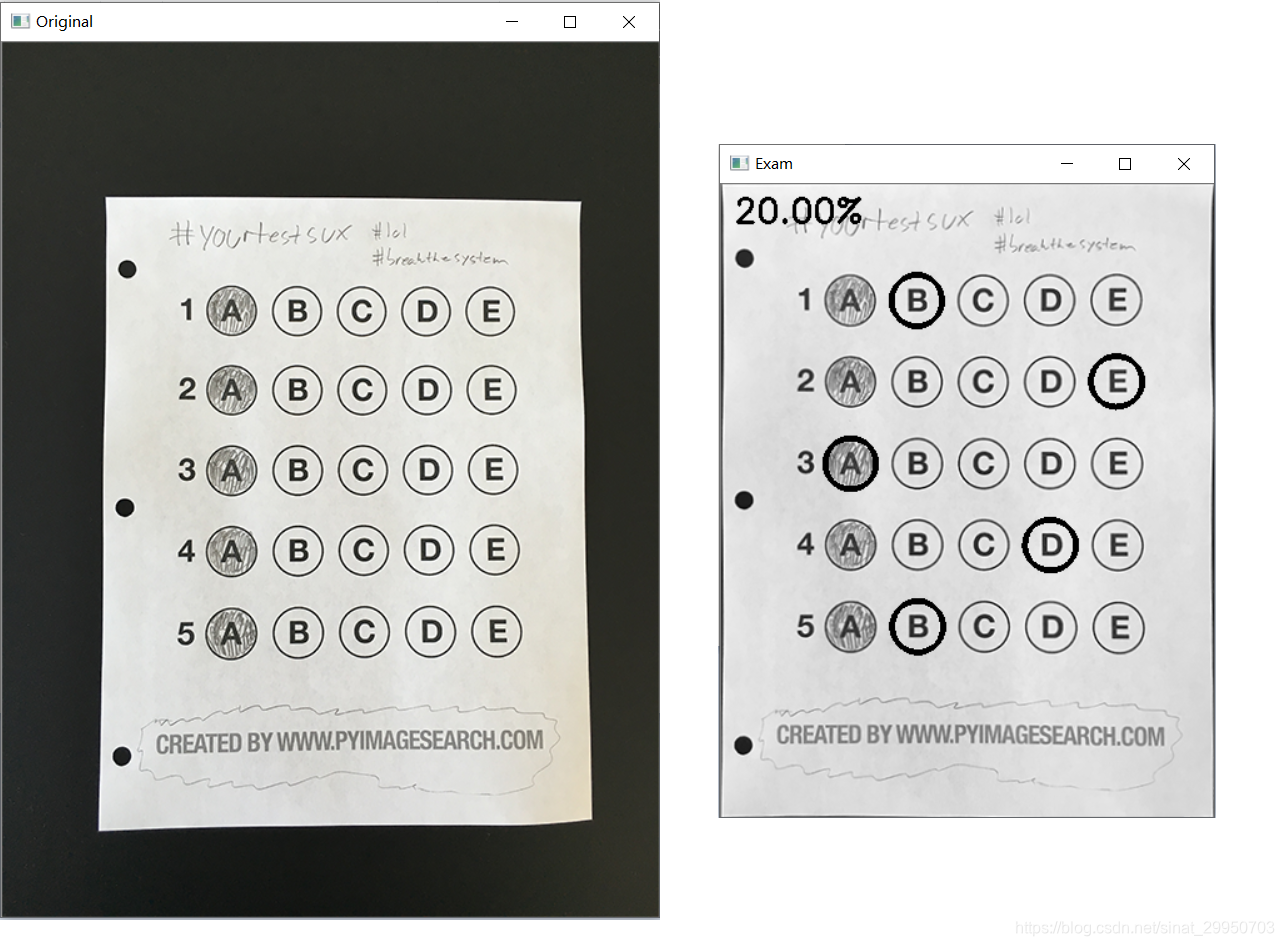
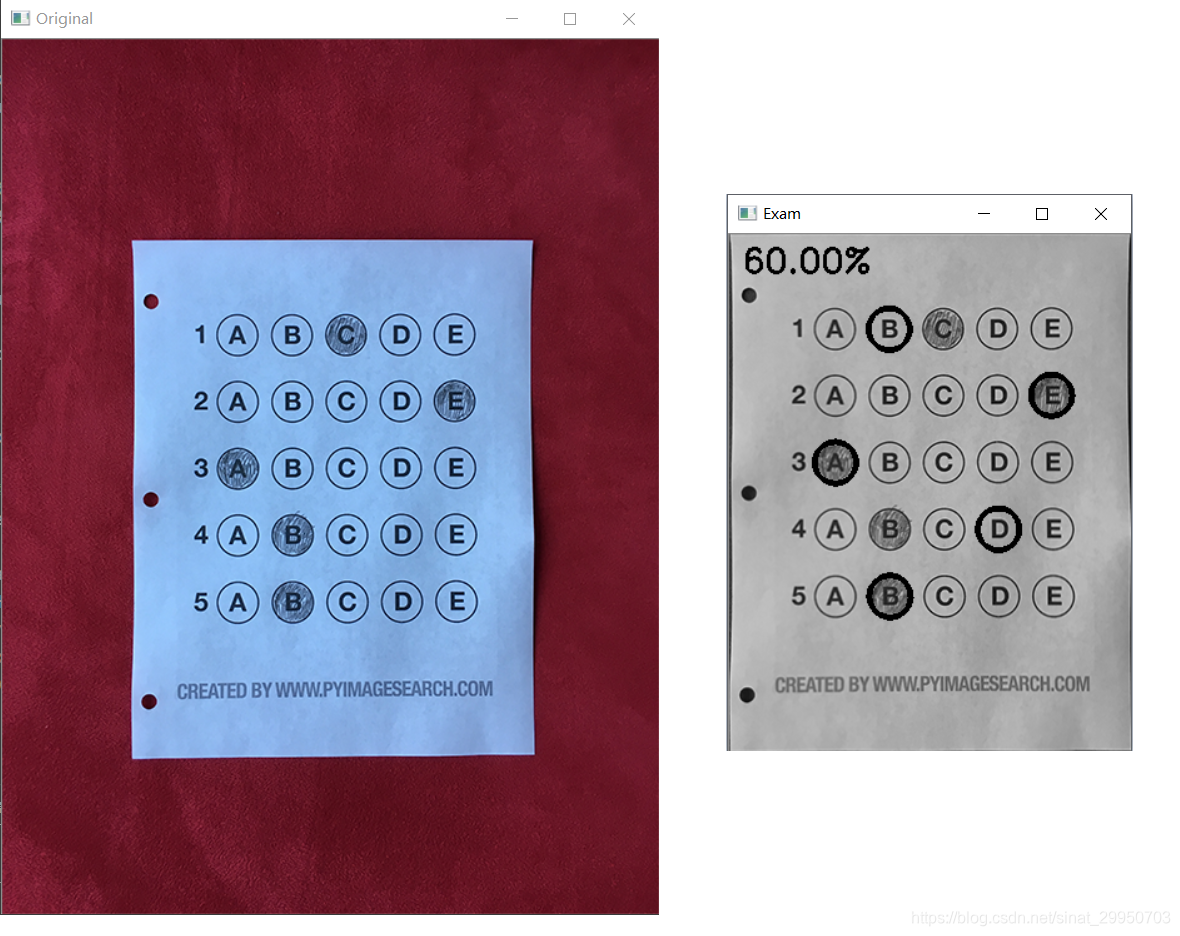
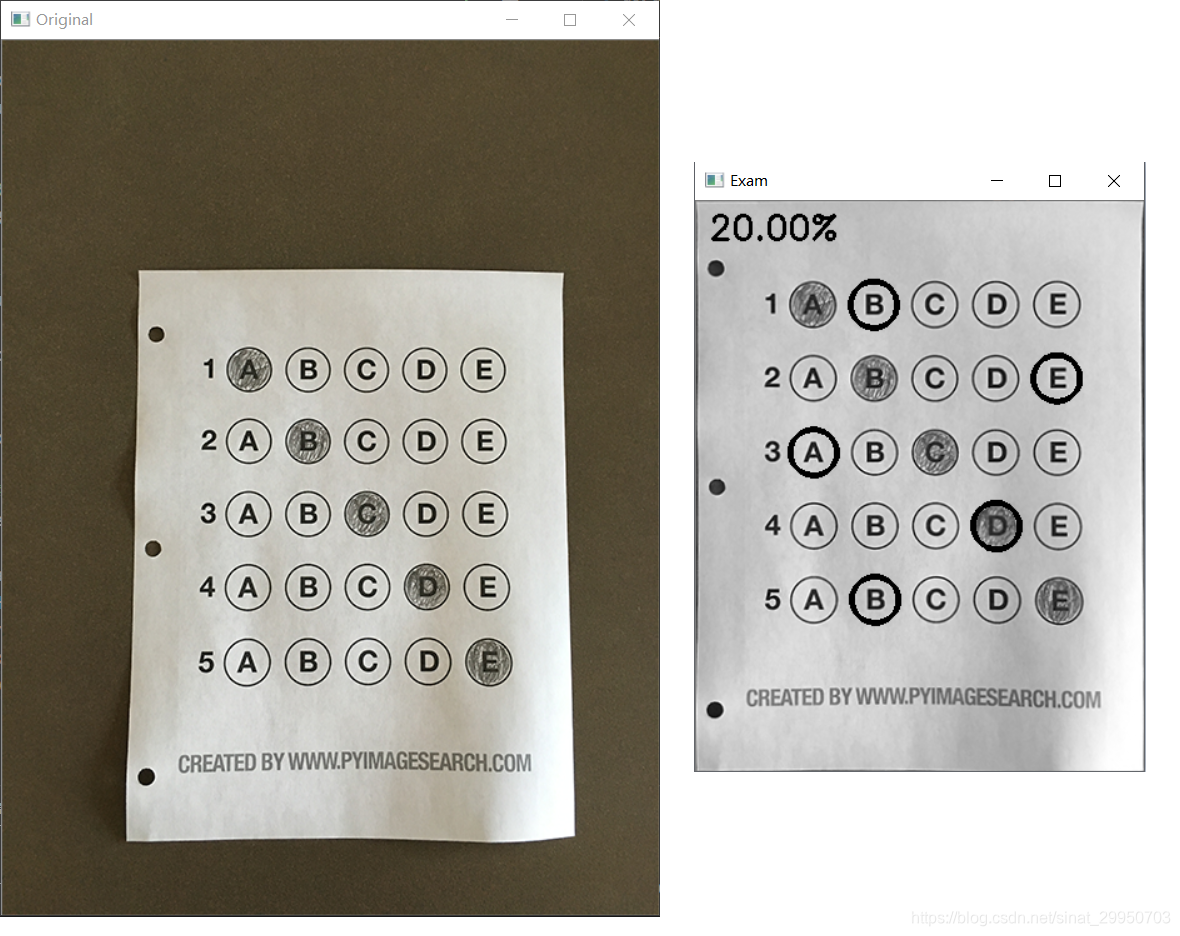
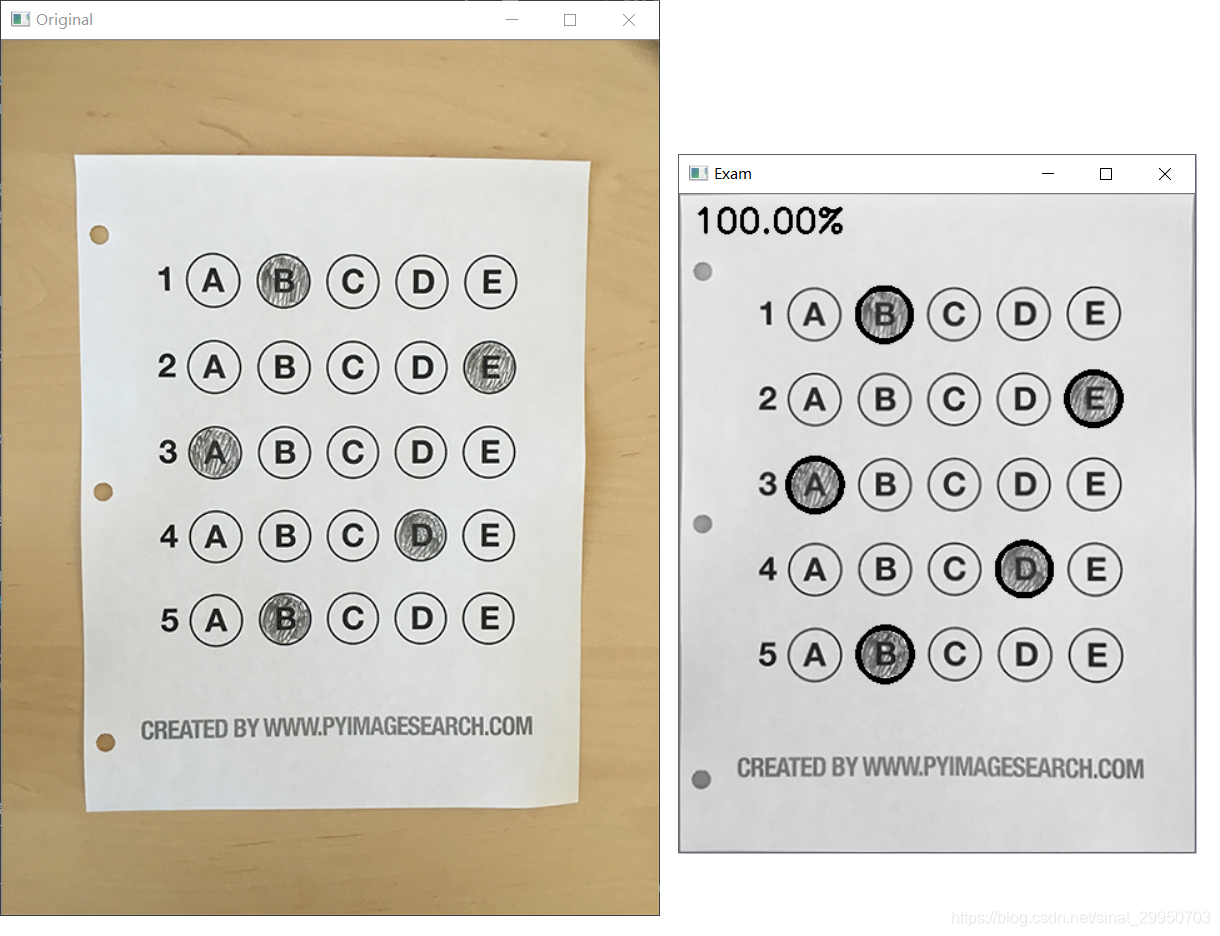
答题卡识别项目实战
答题卡识别效果
在这里插入图片描述
【大致思路】:先进行仿射变换去除背景(只留试卷部分),二值化,圆形轮廓检测,遍历每一行选项,统计非零像素,记录填充选项(即非零像素最多的轮廓区域),与正确答案进行比对,正确则correct数+1,得到总成绩
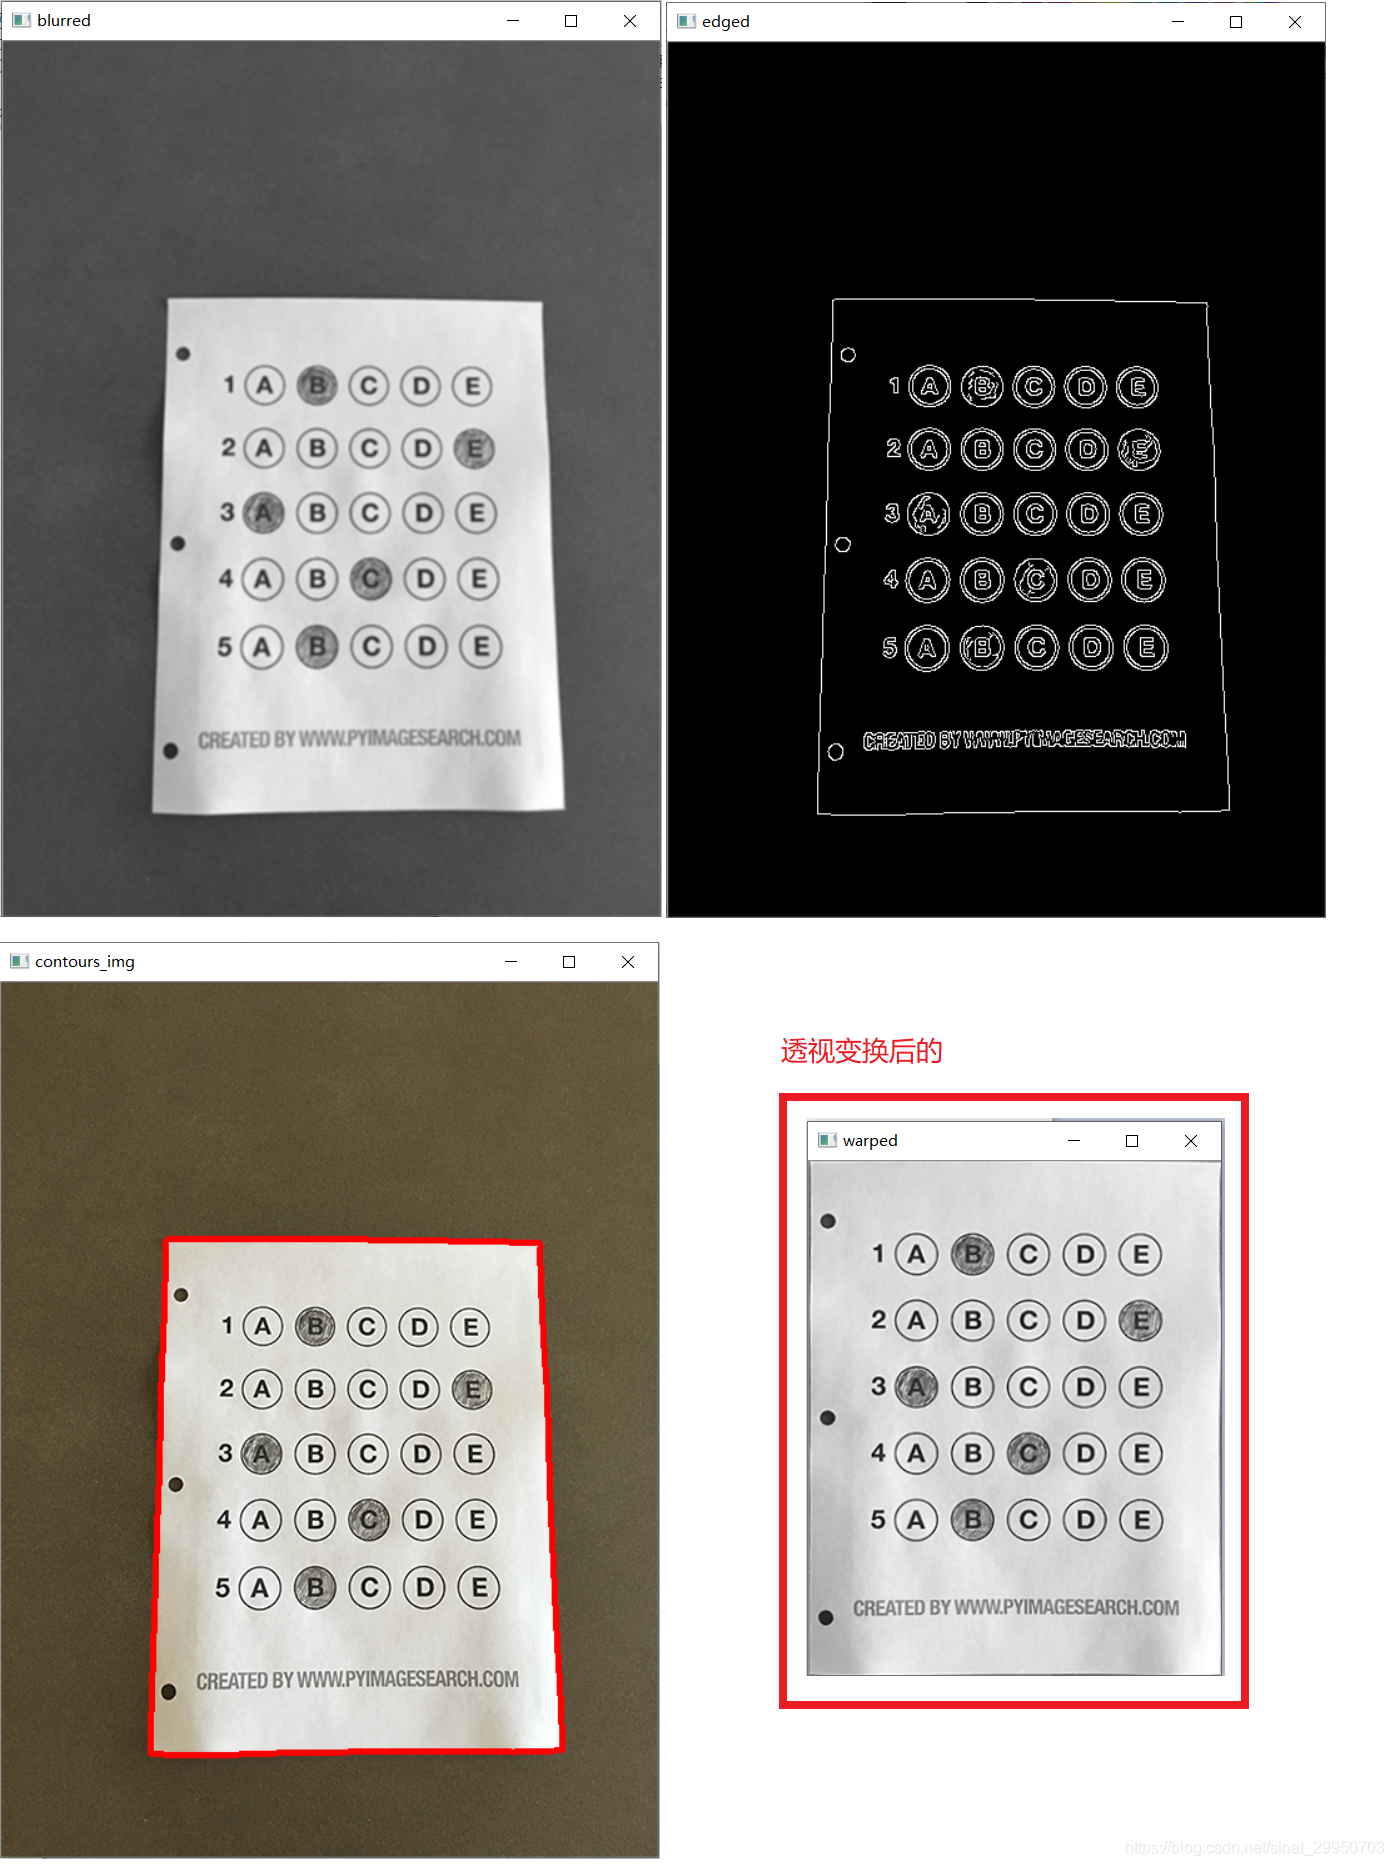
1-4 基础操作+透视变换
1-4是基础操作, 3是做近似变换, 取最大的那个轮廓,最有可能是图像最大外围的轮廓
3的近似变换 和 4的透视变换原理 可以参考我的 OCR文档扫描实战
# 1.预处理
image = cv2.imread(args["image"])
contours_img = image.copy()
gray = cv2.cvtColor(image, cv2.COLOR_BGR2GRAY)
blurred = cv2.GaussianBlur(gray, (5, 5), 0)
cv_show('blurred',blurred)
edged = cv2.Canny(blurred, 75, 200)
cv_show('edged',edged)

# 2.轮廓检测
cnts = cv2.findContours(edged.copy(), cv2.RETR_EXTERNAL,
	cv2.CHAIN_APPROX_SIMPLE)[1]
cv2.drawContours(contours_img,cnts,-1,(0,0,255),3)
cv_show('contours_img',contours_img)
docCnt = None

# 3.确保检测到了
if len(cnts) > 0:
	# 根据轮廓大小进行排序
	cnts = sorted(cnts, key=cv2.contourArea, reverse=True)

	# 遍历每一个轮廓
	for c in cnts:
		# 近似
		peri = cv2.arcLength(c, True)
		approx = cv2.approxPolyDP(c, 0.02 * peri, True)

		# 准备做透视变换
		if len(approx) == 4:
			docCnt = approx
			break

# 4.执行透视变换
warped = four_point_transform(gray, docCnt.reshape(4, 2))
cv_show('warped',warped)
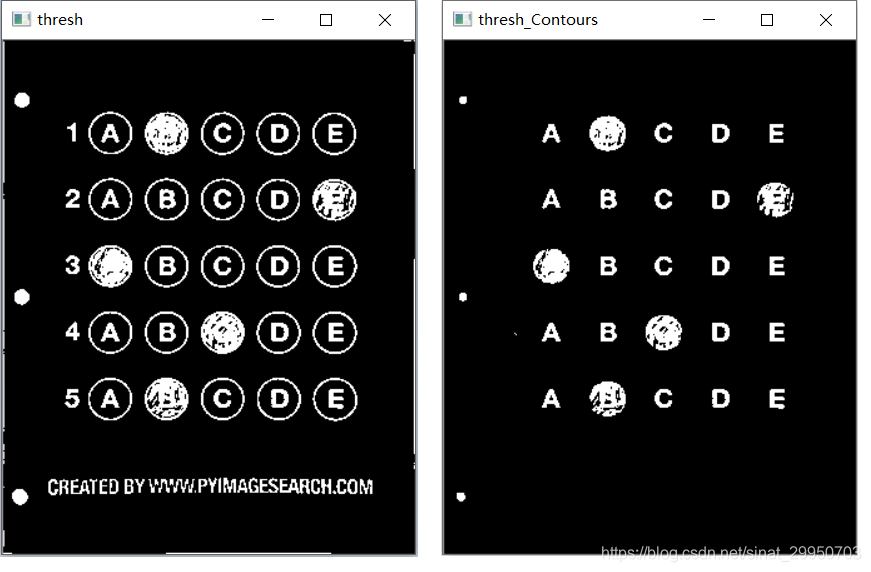
5-6 阈值处理+轮廓检测
5.Otsu’s 阈值处理
THRESH_OTSU会自动寻找合适的阈值,适合双峰,需把阈值参数设置为0
在我的信用卡数字识别案例中出现也有应用(第三、五部分)

6.然后怎么区分涂和没涂的圆?
这里不用霍夫变换,因为有些涂完后 会突出边界,如下
# 5.Otsu's 阈值处理
thresh = cv2.threshold(warped, 0, 255,
	cv2.THRESH_BINARY_INV | cv2.THRESH_OTSU)[1]
cv_show('thresh',thresh)

thresh_Contours = thresh.copy()
# 6.找到每一个圆圈轮廓
cnts = cv2.findContours(thresh.copy(), cv2.RETR_EXTERNAL,
	cv2.CHAIN_APPROX_SIMPLE)[1]
cv2.drawContours(thresh_Contours,cnts,-1,(0,0,255),3)
cv_show('thresh_Contours',thresh_Contours)
questionCnts = []
7-8 筛选答题圈
7.遍历所有圆圈轮廓(包括干扰项) 筛选出答题区域的圆,其轮廓存于questionCnts
无论是圆形还是矩形的答题卡,都是规则的形状,比例相同.
所以这里要人工设定圆圈外接矩形的长宽比例
参考信用卡数字识别 (第四部分)
8.按照从上到下(从左到右)进行排序
参考信用卡数字识别 (第二部分)
# 7.遍历所有圆圈轮廓(包括干扰项) 筛选出答题区域的圆
for c in cnts:
	# 计算比例和大小
	(x, y, w, h) = cv2.boundingRect(c)
	ar = w / float(h)

	# 根据实际情况指定标准	-- 过滤操作
	if w >= 20 and h >= 20 and ar >= 0.9 and ar <= 1.1:
		questionCnts.append(c)

# 8.按照从上到下进行排序
questionCnts = sort_contours(questionCnts,
	method="top-to-bottom")[0]
correct = 0
9.每行的5个选项 分别比对正确答案
答题圈的轮廓questionCnts长度应为25, 间隔5, 可以遍历5次, 则
q 取0 1 2 3 4,共5行;
i 表示从第几个轮廓开始:0,5,10,15,20. 即每行的第一个轮廓
9.每行的5个选项 分别比对正确答案
for (q, i) in enumerate(np.arange(0, len(questionCnts), 5)):
# 9.1排序
cnts = sort_contours(questionCnts[i:i + 5])[0]
bubbled = None
# 9.2 遍历每一个结果
for (j, c) in enumerate(cnts):
    # 9.2.1 使用mask来判断结果
    mask = np.zeros(thresh.shape, dtype="uint8")
    cv2.drawContours(mask, [c], -1, 255, -1) #-1表示填充
    cv_show('mask',mask)
    # 9.2.2 通过计算非零点数量来算是否选择这个答案
    mask = cv2.bitwise_and(thresh, thresh, mask=mask)
    total = cv2.countNonZero(mask)

    # 9.2.3 通过阈值判断
    if bubbled is None or total > bubbled[0]:
        bubbled = (total, j)

# 9.3 获取正确答案
color = (0, 0, 255)
k = ANSWER_KEY[q]

# 9.4 对比答案 并 判断正确
if k == bubbled[1]:
    color = (0, 255, 0)
    correct += 1

# 9.5 绘图
cv2.drawContours(warped, [cnts[k]], -1, color, 3)
9.1 确保每一行的顺序为A B C D E
9.2 同样这么一行里,这5个框有什么不同.
j 取每个选项0 1 2 3 4
9.2.1 使用mask来判断结果
初始化一个 跟透视变换后的图 一样大小的mask(全黑)
然后在mask上, 画出当前遍历的这个(圆圈)轮廓c, 画成白色
cv2.drawContours (传入绘制图像,轮廓,轮廓索引,颜色模式,线条厚度)
参考OpenCV基本操作
补充一点:线条厚度 为负值或CV_FILLED 表示填充轮廓内部
一行遍历5个选项,5行一共25个选项,这展示前两行的遍历结果,后三行同理…
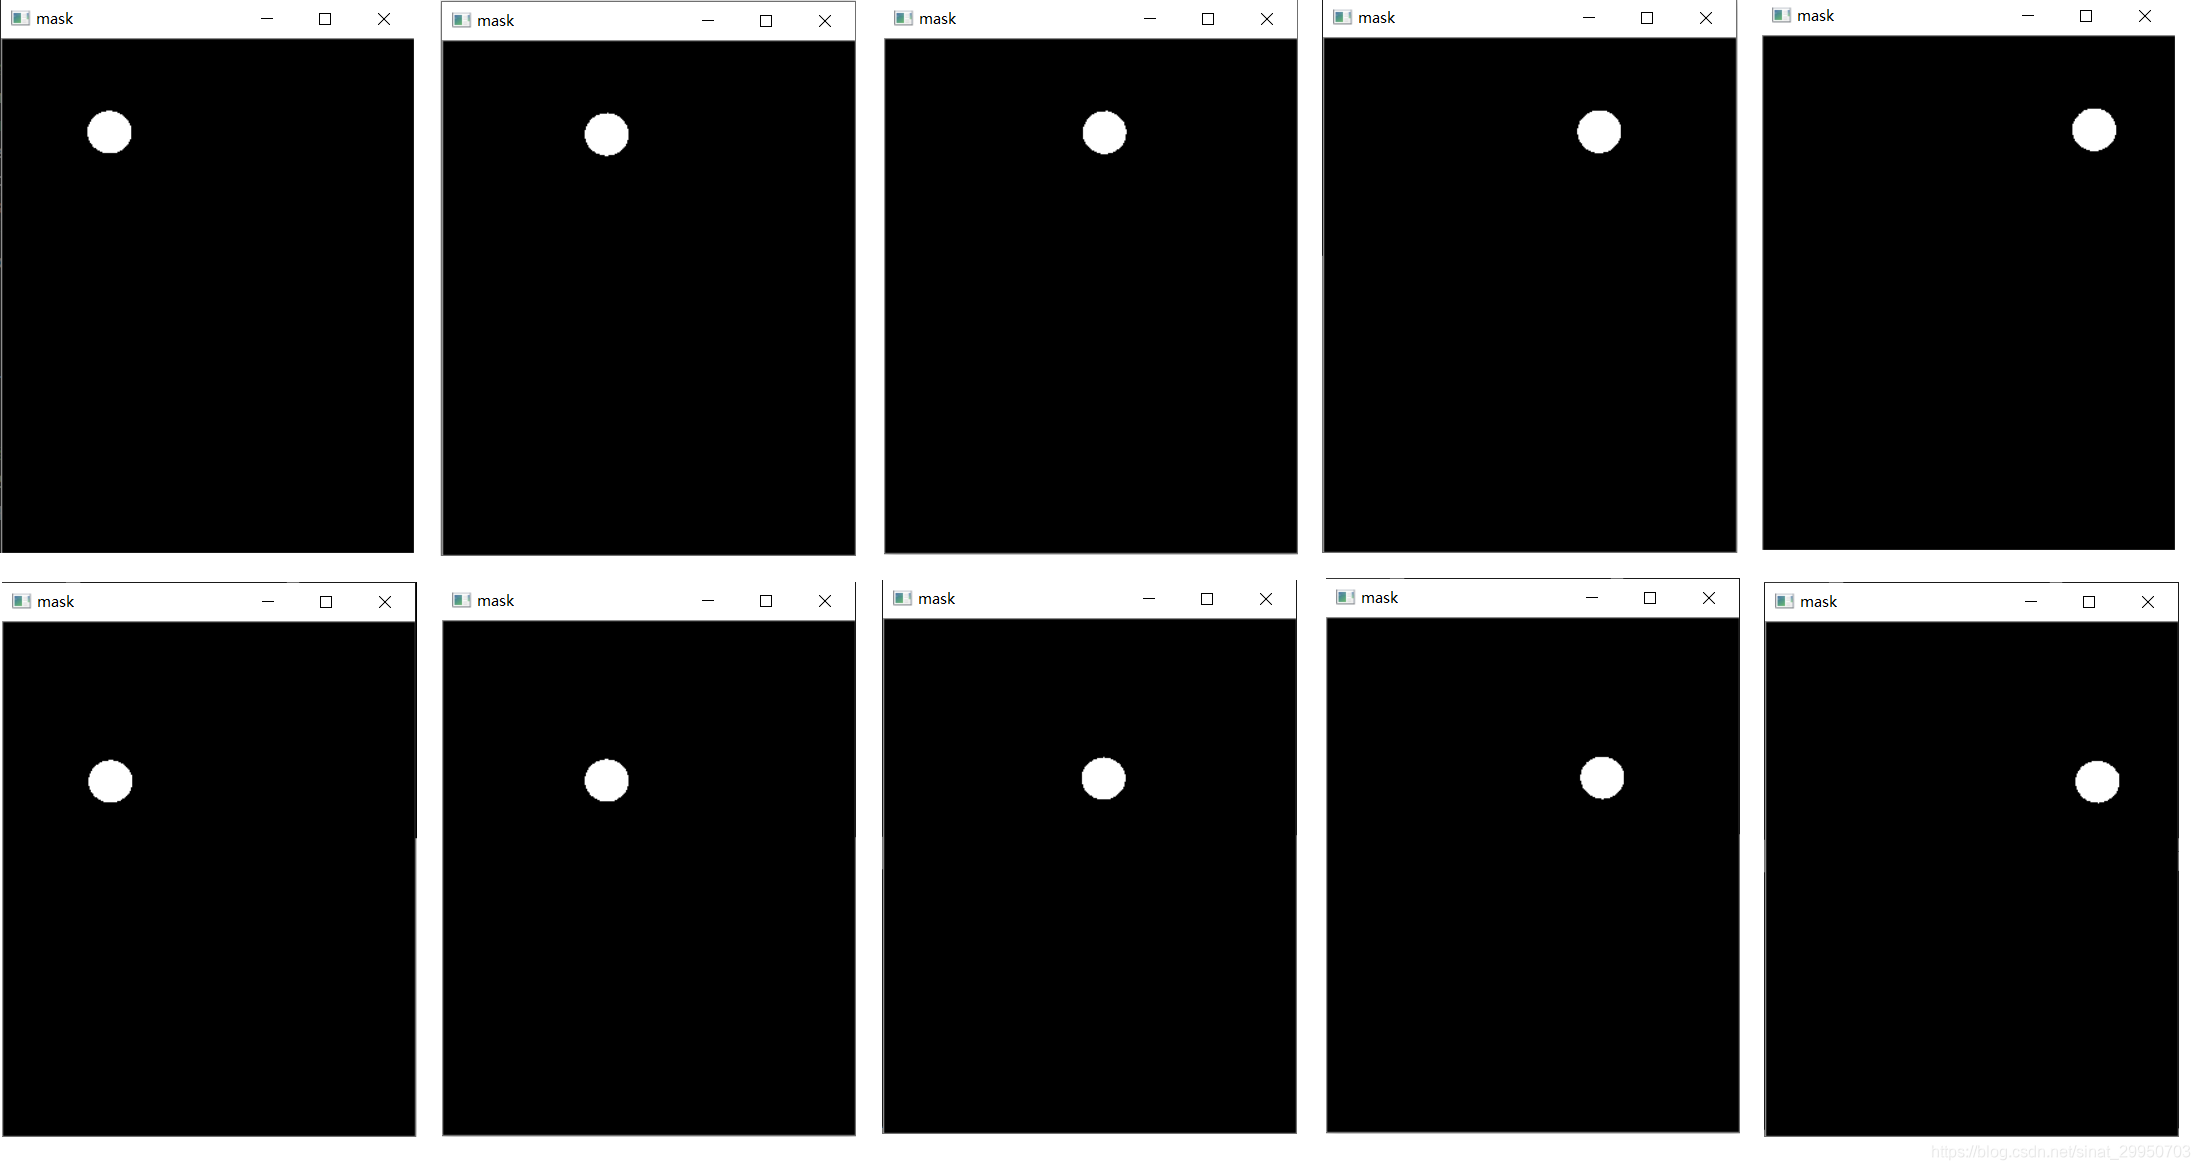
9.2.2 与操作
一张图片 跟 一张相同大小的黑白图片 进行与操作,则只保留图片的白色区域
cv2.bitwise_and(src1, src2, dst=None, mask=None)
对图像(灰度图像或彩色图像均可)每个像素值进行二进制“与”操作,
1&1=1,1&0=0,0&1=0,0&0=0

函数返回值: 调用时若无mask参数 则返回src1 & src2,若存在mask参数,则返回src1 & src2 & mask

    src1:输入原图1
    src2:输入原图2, src1与src2可以相同也可以不相同,可以是灰度图像也可以是彩色图像
    dst:输出矩阵,和输入矩阵一样的尺寸和类型 若存在参数时:src1 & src2 或者 src1 & src2 & mask
    mask:可以是单通道8bit灰度图像,也可以是矩阵,一般为二值化后的图像,指定要更改的输出数组的元素

cv2.countNonZero统计非零像素点个数
9.2.3 依次判断5个选项的哪个非零值最大(即哪个被填充上了)
total > bubbled[0] 比它大的才保留到bubbled
bubbled 保留最大的选项( 即填充上的选项 ) j
9.3 k = ANSWER_KEY[q] 是第几题(行)的正确答案
9.4 若k = bubbled[1],判断正确,correct+=1
.
10.打印正确率
# 10.打印正确率
score = (correct / 5.0) * 100
print("[INFO] score: {:.2f}%".format(score))
cv2.putText(warped, "{:.2f}%".format(score), (10, 30),
	cv2.FONT_HERSHEY_SIMPLEX, 0.9, (0, 255, 0), 2)
cv2.imshow("Original", image)
cv2.imshow("Exam", warped)
cv2.waitKey(0)
* 测试其他答题卡效果
结束语
虽然代码有点长,但大部分内容都是前面几个项目有用到的知识。可见遇到不同场景的举一反三能力多重要啦
扩展
有兴趣的同学们 可以尝试一下矩形答题卡的识别
完整代码
一个py文件,3个函数
# 导入工具包
import numpy as np
import argparse
import cv2
def order_points(pts):
	# 一共4个坐标点
	rect = np.zeros((4, 2), dtype = "float32")

	# 按顺序找到对应坐标0123分别是 左上,右上,右下,左下
	# 计算左上,右下
	s = pts.sum(axis = 1)
	rect[0] = pts[np.argmin(s)]
	rect[2] = pts[np.argmax(s)]

	# 计算右上和左下
	diff = np.diff(pts, axis = 1)
	rect[1] = pts[np.argmin(diff)]
	rect[3] = pts[np.argmax(diff)]

	return rect

def four_point_transform(image, pts):
	# 获取输入坐标点
	rect = order_points(pts)
	(tl, tr, br, bl) = rect

	# 计算输入的w和h值
	widthA = np.sqrt(((br[0] - bl[0]) ** 2) + ((br[1] - bl[1]) ** 2))
	widthB = np.sqrt(((tr[0] - tl[0]) ** 2) + ((tr[1] - tl[1]) ** 2))
	maxWidth = max(int(widthA), int(widthB))

	heightA = np.sqrt(((tr[0] - br[0]) ** 2) + ((tr[1] - br[1]) ** 2))
	heightB = np.sqrt(((tl[0] - bl[0]) ** 2) + ((tl[1] - bl[1]) ** 2))
	maxHeight = max(int(heightA), int(heightB))

	# 变换后对应坐标位置
	dst = np.array([
		[0, 0],
		[maxWidth - 1, 0],
		[maxWidth - 1, maxHeight - 1],
		[0, maxHeight - 1]], dtype = "float32")

	# 计算变换矩阵
	M = cv2.getPerspectiveTransform(rect, dst)
	warped = cv2.warpPerspective(image, M, (maxWidth, maxHeight))

	# 返回变换后结果
	return warped
def sort_contours(cnts, method="left-to-right"):
    reverse = False
    i = 0
    if method == "right-to-left" or method == "bottom-to-top":
        reverse = True
    if method == "top-to-bottom" or method == "bottom-to-top":
        i = 1
    boundingBoxes = [cv2.boundingRect(c) for c in cnts]
    (cnts, boundingBoxes) = zip(*sorted(zip(cnts, boundingBoxes),
                                        key=lambda b: b[1][i], reverse=reverse))
    return cnts, boundingBoxes
def cv_show(name,img):
    cv2.imshow(name, img)
    cv2.waitKey(0)
    cv2.destroyAllWindows()

'''下面为主函数'''
if __name__ == "__main__":
	# 设置参数
	ap = argparse.ArgumentParser()
	ap.add_argument("-i", "--image", required=True,
		help="path to the input image")
	args = vars(ap.parse_args())

	# 正确答案
	ANSWER_KEY = {0: 1, 1: 4, 2: 0, 3: 3, 4: 1}

	# 1.预处理
	image = cv2.imread(args["image"])
	contours_img = image.copy()
	gray = cv2.cvtColor(image, cv2.COLOR_BGR2GRAY)
	blurred = cv2.GaussianBlur(gray, (5, 5), 0)
	cv_show('blurred',blurred)
	edged = cv2.Canny(blurred, 75, 200)
	cv_show('edged',edged)

	# 2.轮廓检测
	cnts = cv2.findContours(edged.copy(), cv2.RETR_EXTERNAL,
		cv2.CHAIN_APPROX_SIMPLE)[1]
	cv2.drawContours(contours_img,cnts,-1,(0,0,255),3)
	cv_show('contours_img',contours_img)
	docCnt = None

	# 3.确保检测到了
	if len(cnts) > 0:
		# 根据轮廓大小进行排序
		cnts = sorted(cnts, key=cv2.contourArea, reverse=True)

		# 遍历每一个轮廓
		for c in cnts:
			# 近似
			peri = cv2.arcLength(c, True)
			approx = cv2.approxPolyDP(c, 0.02 * peri, True)

			# 准备做透视变换
			if len(approx) == 4:
				docCnt = approx
				break

	# 4.执行透视变换
	warped = four_point_transform(gray, docCnt.reshape(4, 2))
	cv_show('warped',warped)
	# 5.Otsu's 阈值处理
	thresh = cv2.threshold(warped, 0, 255,
		cv2.THRESH_BINARY_INV | cv2.THRESH_OTSU)[1]
	cv_show('thresh',thresh)

	thresh_Contours = thresh.copy()
	# 6.找到所有轮廓
	cnts = cv2.findContours(thresh.copy(), cv2.RETR_EXTERNAL,
		cv2.CHAIN_APPROX_SIMPLE)[1]
	cv2.drawContours(thresh_Contours,cnts,-1,(0,0,255),3)
	cv_show('thresh_Contours',thresh_Contours)
	questionCnts = []

	# 7.遍历所有圆圈轮廓(包括干扰项) 筛选出答题区域的圆
	for c in cnts:
		# 计算比例和大小
		(x, y, w, h) = cv2.boundingRect(c)
		ar = w / float(h)

		# 根据实际情况指定标准	-- 过滤操作
		if w >= 20 and h >= 20 and ar >= 0.9 and ar <= 1.1:
			questionCnts.append(c)

	# 8.按照从上到下进行排序
	questionCnts = sort_contours(questionCnts,
		method="top-to-bottom")[0]
	correct = 0

	# 9.每行的5个选项 分别比对正确答案
	for (q, i) in enumerate(np.arange(0, len(questionCnts), 5)):
		# 9.1排序
		cnts = sort_contours(questionCnts[i:i + 5])[0]
		bubbled = None

		# 9.2 遍历每一个结果
		for (j, c) in enumerate(cnts):
			# 9.2.1 使用mask来判断结果
			mask = np.zeros(thresh.shape, dtype="uint8")
			cv2.drawContours(mask, [c], -1, 255, -1) #-1表示填充
			# cv_show('mask',mask)
			# 9.2.2 通过计算非零点数量来算是否选择这个答案
			mask = cv2.bitwise_and(thresh, thresh, mask=mask)
			total = cv2.countNonZero(mask)

			# 9.2.3 通过阈值判断
			if bubbled is None or total > bubbled[0]:
				bubbled = (total, j)

		# 9.3 获取正确答案
		color = (0, 0, 255)
		k = ANSWER_KEY[q]

		# 9.4 对比答案 并 判断正确
		if k == bubbled[1]:
			color = (0, 255, 0)
			correct += 1

		# 9.5 绘图
		cv2.drawContours(warped, [cnts[k]], -1, color, 3)

	# 10.打印正确率
	score = (correct / 5.0) * 100
	print("[INFO] score: {:.2f}%".format(score))
	cv2.putText(warped, "{:.2f}%".format(score), (10, 30),
		cv2.FONT_HERSHEY_SIMPLEX, 0.9, (0, 255, 0), 2)
	cv2.imshow("Original", image)
	cv2.imshow("Exam", warped)
	cv2.waitKey(0)
————————————————
版权声明:本文为CSDN博主「龙共日尧」的原创文章,遵循CC 4.0 BY-SA版权协议,转载请附上原文出处链接及本声明。
原文链接:https://blog.csdn.net/sinat_29950703/article/details/108287249
相关文章收藏:
清除指定Html标签
/**
 * 删除指定标签
 * @param array  $tags    删除的标签
 * @param string $str     html字符串
 * @param bool   $type    是否保留标签的内容
 * @return mixed
 * @usage
 *  $str = 'Hello</p><p><img src="http://www.baidu.com" /></b><Video>';
 *
 *      // echo strip_tags($str, '<img');
 *      echo $this->stripHtmlTags(array('b','p'),$str,true);
 */
public static function stripHtmlTags($str,$tags=['p','b'], $content=true)
{
    $html = [];
    if($content){
        foreach ($tags as $tag) {
            $html[] = "/(<(?:\/" .$tag. "|" .$tag. ")[^>]*>)/is";
        }
    }else{
        foreach ($tags as $tag) {
            $html[] = '/<' .$tag. '.*?>[\s|\S]*?<\/' .$tag. '>/is';
            $html[] = '/<' .$tag. '.*?>/is';
        }
    }
    $data = preg_replace($html, '', $str);
    return $data;
}