yii跨域处理_Yii2下session跨域名共存的解决方案

本文转自:https://blog.csdn.net/weixin_29130369/article/details/111922231?utm_medium=distribute.pc_relevant.none-task-blog-baidujs_title-2&spm=1001.2101.3001.4242

前面谈过session相关配置,在开发的时候,常需要跨域共用session的是登录模块,我相信很多开发的朋友的都遇到过,只需要一个地方登录,相关联的网站也是处于登录状态。两种情况:一种9streets.cn和a.9streets.cn之间,另一种是a.com b.com之间,这几天总结了一下处理方法。

无论是一二级域名,和不同域名下的跨域,无非要达到两点:

客户端访问同一个sessionId,

所有域名对应的服务器访问的session的数据的位置必须一致。

1.访问共同的sessionId主要是通过把当前的sessionId写进cookie里面

cookie在不同域名下是不能访问的,我们需要在访问在后台设置用户在登录的时候,把需要共用的登录信息的域名,如果是在1,2级域名下,直接把cookie设置为所属主域名,例如:

setcookie(“session_id”,session_id(),time()+3600*24*365*10,”/”,”.a.com”);

也许你会问:如果是在不同的域名呢?采用P3P技术简单解决,实现原理,在访问网站x.com的时候,y.com程序触发y.com文件的写入sessionid值,sessionid值便可以获取,然后把seesion值存入数据库,取相同的sessionid值便可。这就要求y.com里面的程序文件必需能跨域访问,默认情况下,浏览器是不能跨域设置cookie的,加上p3p头后才行。在对应php文件加上:header(‘P3P: CP=”CURa ADMa DEVa PSAo PSDo OUR BUS UNI PUR INT DEM STA PRE COM NAV OTC NOI DSP COR”‘);

2.session数据存储位置一致的实现方法

session该数据默认情况下是存放在服务器的tmp文件下的,是以文件形式存在,而非存储在服务器的内存中,在这里我们得修改为所有域下都能访问的方式。网上介绍了数据库存储,文件形式存储,内存存储, 如果用数据库存储session数据,网站的访问量很大的话,SESSION 的读写会频繁地对数据库进行操作,效率就会明显降低,可以考虑存在内存服务器来实现,下面的session.rar里面介绍的是数据库存session的实例。

在yii2下 处理这中问题,根据网上搜到的教程 终配置成功教程如下:

$host = explode('.', $_SERVER["HTTP_HOST"]);
if (count($host) > 2) {
	define('DOMAIN', $host[1] . '.' . $host[2]);
} else {
	define('DOMAIN', $host[0] . '.' . $host[1]);
}
define('DOMAIN_HOME', 'www.' . DOMAIN);
define('DOMAIN_USER_CENTER', 'man.' . DOMAIN);
define('DOMAIN_API', 'api.' . DOMAIN);
define('DOMAIN_EMAIL', 'mail.' . DOMAIN);
define('DOMAIN_LOGIN', 'login.' . DOMAIN);
define('DOMAIN_IMG', 'img.' . DOMAIN);

然后配置User 和 Session:

'user' => [
'enableAutoLogin' => true,
'identityCookie' => ['name' => '_identity', 'httpOnly' => true, 'domain' => '.' . DOMAIN],
],
'session' => [
     'cookieParams' => ['domain' => '.' . DOMAIN, 'lifetime' => 0],
     'timeout' => 3600,
],

这里在配置项的user和session里 我把domain写死了例如:’domain’=>’.baidu.com’,这样就不用判断了.

以上就是本文的全部内容,希望对大家的学习有所帮助,也希望大家多多支持脚本之家。

PHP读取word文档里的文字及图片,并保存

一、composer安装phpWord

composer require phpoffice/phpword

传送门:https://packagist.org/packages/phpoffice/phpword

二、phpWord 读取 docx 文档(注意是docx格式,doc格式不行)

如果你的文件是doc格式,直接另存为一个docx就行了;如果你的doc文档较多,可以下一个批量转换工具:http://www.batchwork.com/en/doc2doc/download.htm

如果你还没配置自动加载,则先配置一下:

require ‘./vendor/autoload.php’;

加载文档:

$dir = str_replace('\', '/', DIR) . '/';
$source = $dir . 'test.docx';
$phpWord = \PhpOffice\PhpWord\IOFactory::load($source);

三、关键点

1)对齐方式:PhpOffice\PhpWord\Style\Paragraph -> getAlignment()

2)字体名称:\PhpOffice\PhpWord\Style\Font -> getName()

3)字体大小:\PhpOffice\PhpWord\Style\Font -> getSize()

4)是否加粗:\PhpOffice\PhpWord\Style\Font -> isBold()

5)读取图片:\PhpOffice\PhpWord\Element\Image -> getImageStringData()

6)ba64格式图片数据保存为图片:file_put_contents($imageSrc, base64_decode($imageData))

四、完整代码

 require './vendor/autoload.php';
 function docx2html($source)
 {
     $phpWord = \PhpOffice\PhpWord\IOFactory::load($source);
     $html = '';
     foreach ($phpWord->getSections() as $section) {
         foreach ($section->getElements() as $ele1) {
             $paragraphStyle = $ele1->getParagraphStyle();
             if ($paragraphStyle) {
                 $html .= '
             } else {
                 $html .= '
';             }             if ($ele1 instanceof \PhpOffice\PhpWord\Element\TextRun) {                 foreach ($ele1->getElements() as $ele2) {                     if ($ele2 instanceof \PhpOffice\PhpWord\Element\Text) {                         $style = $ele2->getFontStyle();                         $fontFamily = mb_convert_encoding($style->getName(), 'GBK', 'UTF-8');                         $fontSize = $style->getSize();                         $isBold = $style->isBold();                         $styleString = '';                         $fontFamily && $styleString .= "font-family:{$fontFamily};";                         $fontSize && $styleString .= "font-size:{$fontSize}px;";                         $isBold && $styleString .= "font-weight:bold;";                         $html .= sprintf('%s',                             $styleString,                             mb_convert_encoding($ele2->getText(), 'GBK', 'UTF-8')                         );                     } elseif ($ele2 instanceof \PhpOffice\PhpWord\Element\Image) {                         $imageSrc = 'images/' . md5($ele2->getSource()) . '.' . $ele2->getImageExtension();                         $imageData = $ele2->getImageStringData(true);                         // $imageData = 'data:' . $ele2->getImageType() . ';base64,' . $imageData;                         file_put_contents($imageSrc, base64_decode($imageData));                         $html .= '';                     }                 }             }             $html .= '
';
         }
     }
 return mb_convert_encoding($html, 'UTF-8', 'GBK');
 }
 $dir = str_replace('\', '/', DIR) . '/';
 $source = $dir . 'test.docx';
 echo docx2html($source);     

五、补充

很明显,这是一个简陋的word读取示例,只读取了段落的对齐方式,文字的字体、大小、是否加粗及图片等信息,其他例如文字颜色、行高。。。等等信息都忽悠了。需要的话,请自行查看phpWord源码,看\PhpOffice\PhpWord\Style\xxx 和 \PhpOffice\PhpWord\Element\xxx 等类里有什么读取方法就可以了

六、2020-07-21 补充

可以用以下方法直接获取到完整的html

$phpWord = \PhpOffice\PhpWord\IOFactory::load('xxx.docx');
$xmlWriter = \PhpOffice\PhpWord\IOFactory::createWriter($phpWord, "HTML");
$html = $xmlWriter->getContent();

注:html内容里包含了head部分,如果只需要style和body的话,需要自己处理一下;然后图片是base64的,要保存的话,也需要自己处理一下

base64数据保存为图片请参考上面代码

如果只想获取body里的内容,可以参考 \PhpOffice\PhpWord\Writer\HTML\Part\Body 里的 write 方法
复制代码

$phpWord = \PhpOffice\PhpWord\IOFactory::load('xxxx.docx');
$htmlWriter = \PhpOffice\PhpWord\IOFactory::createWriter($phpWord, "HTML");
$content = '';
foreach ($phpWord->getSections() as $section) {
$writer = new \PhpOffice\PhpWord\Writer\HTML\Element\Container($htmlWriter, $section);
$content .= $writer->write();
}
echo $content;exit;

图片的处理的话,暂时没有好办法能在不修改源码的情况下处理好,改源码的话,相关代码在 \PhpOffice\PhpWord\Writer\HTML\Element\Image 里

public function write()
 {
     if (!$this->element instanceof ImageElement) {
         return '';
     }
     $content = '';
     $imageData = $this->element->getImageStringData(true);
     if ($imageData !== null) {
         $styleWriter = new ImageStyleWriter($this->element->getStyle());
         $style = $styleWriter->write();
         // $imageData = 'data:' . $this->element->getImageType() . ';base64,' . $imageData;
         $imageSrc = 'images/' . md5($this->element->getSource()) . '.' . $this->element->getImageExtension();
         // 这里可以自己处理,上传oss之类的
         file_put_contents($imageSrc, base64_decode($imageData));
     $content .= $this->writeOpening();     $content .= "<img border=\"0\" style=\"{$style}\" src=\"{$imageSrc}\"/>";     $content .= $this->writeClosing(); } return $content;
 }

Anaconda使用方法

1.创建新环境:

conda create --name <env_name> <package_names>

如:conda create -n python3 python=3.5 numpy pandas

2.切换环境:

activate <env_name>

使用Phpword实现word转html

//Word转HTML
$phpWord = \PhpOffice\PhpWord\IOFactory::load('./word/hello.docx');
$xmlWriter = \PhpOffice\PhpWord\IOFactory::createWriter($phpWord, "HTML");
$xmlWriter->save('./html/hello.html'); 

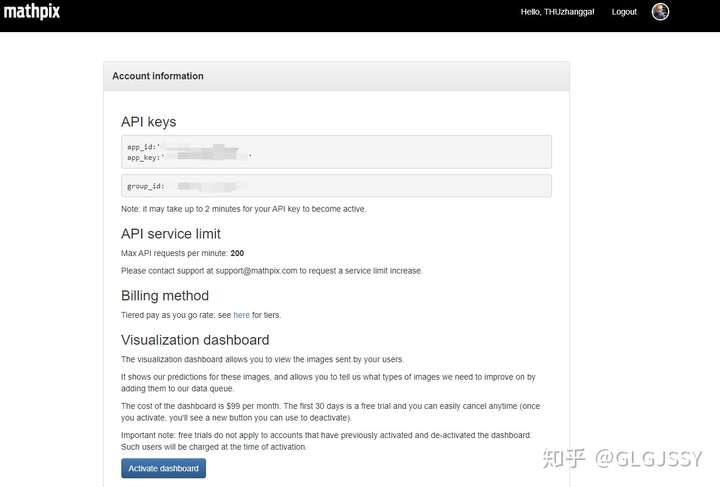
Mathpix收费了?快使用API吧,个月免费识别1000次!

最近,数学公式OCR神器Mathpix 开始收费,一个月只能免费用50次,再用就得5刀一月,小伙伴们顿时叫苦不迭。想想这种套路国内互联网公司不知道玩了多少次了,从滴滴打车到美团外卖再到共享单车,都是先培养消费习惯再收割一波韭菜。但是当初大家都只顾享受免费识别公式带来的快感,哪知由俭入奢易,由奢入俭难,现在再手敲公式真是痛苦不堪。

目前来看,由于需要联网识别,基本没有空子可钻。当然也不排除个别神人用大量邮箱来白嫖:如何看待 Mathpix 收费?​www.zhihu.com

但是,Mathpix官网对于一些有能力的开发者还是开了一扇后门的:Mathpix OCR​mathpix.com

从它提供的OCR API来看,一个月可以免费使用1000次!在之后一直到10万次都是0.004美元(约合0.028元)一次。对个人使用者而言,1000次已经基本够了。

首先需要登录平台:MathpixOCR login​dashboard.mathpix.com

登录之后需要输入信用卡信息,完成账号激活。

激活后,将会显示API的id和key:

API官方文档:Mathpix API v3 Reference​docs.mathpix.com

Github上给出了具体示例:Mathpix/api-examples​github.com

以Python为例,只需要在mathpix.py中填写自己的id和key,再调用simple.py就能运行。从示例来看,它识别的是本地图片。我在它的基础上加入了识别剪贴板的代码,从而达成与Mathpix相似度为99%的使用体验。

import os
import base64
import requests
import json
from PIL import ImageGrab
#
# Common module for calling Mathpix OCR service from Python.
#
# N.B.: Set your credentials in environment variables APP_ID and APP_KEY,
# either once via setenv or on the command line as in
# APP_ID=my-id APP_KEY=my-key python3 simple.py 
#

env = os.environ

default_headers = {
    'app_id': env.get('APP_ID', '你的id'),
    'app_key': env.get('APP_KEY', '你的key'),
    'Content-type': 'application/json'
}

service = 'https://api.mathpix.com/v3/latex'

#
# Return the base64 encoding of an image with the given filename.
#
def image_uri(filename):
    image_data = open(filename, "rb").read()
    return "data:image/jpg;base64," + base64.b64encode(image_data).decode()

#
# Call the Mathpix service with the given arguments, headers, and timeout.
#
def latex(args, headers=default_headers, timeout=30):
    r = requests.post(service,
        data=json.dumps(args), headers=headers, timeout=timeout)
    return json.loads(r.text)


def mathpix_clipboard(): # 识别剪贴板公式
    im = ImageGrab.grabclipboard()
    im.save('equa.png','PNG')
    r = latex({
        'src': image_uri("equa.png"),
        'formats': ['latex_simplified']
    })
    print(r['latex_simplified'])

if __name__ == '__main__':
    mathpix_clipboard()
    

PHP操作Excel

安装

composer require phpoffice/phpspreadsheet

简单使用

use PhpOffice\PhpSpreadsheet\Spreadsheet;
use PhpOffice\PhpSpreadsheet\Writer\Xlsx;

$spreadsheet = new Spreadsheet();

for($i=1;$i<=3;$i++)
{
        if($i > 1)
        {
                $sheet = $spreadsheet->createSheet();
        }
        $spreadsheet->setActiveSheetIndex($i-1);
        $sheet = $spreadsheet->getActiveSheet();
        $sheet->setTitle('sheet_sheet'.$i);
        $sheet->setCellValue('A1', 'Hello World !'.$i);
}


$writer = new Xlsx($spreadsheet);
$writer->save('./public/hello world.xlsx');

GridView直接更新数据,kartik\grid\EditableColumn用法 [ 2.0 版本 ]

本文转自:https://www.yiichina.com/tutorial/1110

<?php
use yii\helpers\Url;
use common\models\ProductCategory;

return [
    [
        'class' => 'kartik\grid\SerialColumn',
        'width' => '30px',
    ],

    [
        //'class' => '\kartik\grid\DataColumn',
        'attribute' => 'name',
        'class' => '\kartik\grid\EditableColumn',
    ],
    [
        'class' => '\kartik\grid\DataColumn',
        'attribute' => 'category.name',
    ],

    [
        'class' => '\kartik\grid\EditableColumn',
        'attribute' => 'price',
    ],

    'created_at:datetime',
    
    [
        'class' => 'kartik\grid\ActionColumn',
        'dropdown' => false,
        'vAlign' => 'middle',
        'urlCreator' => function ($action, $model, $key, $index) {
            return Url::to([$action, 'id' => $key]);
        },
        'header' => Yii::t('app', '操作'),
        'viewOptions' => ['role' => 'modal-remote', 'title' => 'View', 'data-toggle' => 'tooltip'],
        'updateOptions' => ['role' => 'modal-remote', 'title' => 'Update', 'data-toggle' => 'tooltip'],
        'deleteOptions' => ['role' => 'modal-remote', 'title' => 'Delete',
            'data-confirm' => false, 'data-method' => false,// for overide yii data api
            'data-request-method' => 'post',
            'data-toggle' => 'tooltip',
            'data-confirm-title' => Yii::t('app', '操作确认'),
            'data-confirm-message' => Yii::t('app', '你确定要删除这个选项吗?')],
    ],

];

在控制器index方法里加上一段

/**
 * Lists all Product models.
 * @return mixed
 */
public function actionIndex()
{    
    $searchModel = new ProductSearch();
    $dataProvider = $searchModel->search(Yii::$app->request->queryParams);


    if ($this->isAjax && Yii::$app->request->post('hasEditable')) {
        Yii::$app->response->format = Response::FORMAT_JSON;
        
        $model = Product::findOne($this->post['editableKey']);

        $out = ['output' => '', 'message' => ''];

        $this->post[$model->formName()] = $this->post[$model->formName()][$this->post['editableIndex']];

        if ($model->load($this->post)) {
            // can save model or do something before saving model
            if($model->save()) {

                $output = '';

                /*if (isset($this->post[$model->formName()]['price_cny'])) {
                    $output = Yii::$app->formatter->asDecimal($model->price, 2);
                }*/

                $out = ['output' => $output, 'message' => ''];
            }else{
                $out['message'] = $model->getErrors();
            }
        }else{
            $out['message'] = $model->getErrors();
        }
        return $out;
    }
    

    return $this->render('index', [
        'searchModel' => $searchModel,
        'dataProvider' => $dataProvider,
    ]);
}

如果需要做权限控制之类的,修改提交地址不想直接放在index方法,可以自定义提交地址,加上editableOptions参数即可

[
    //'class' => '\kartik\grid\DataColumn',
    'class' => '\kartik\grid\EditableColumn',
    'attribute' => 'price',
    'editableOptions'=> function ($model, $key, $index) {
        return [
            //'size'=>'sm',
            'formOptions' => [
                'method'=>'post',
                'action' => ['editable']
            ]
        ];
    }
],

如何从基于Web的cron作业创建和管理

You may try to use yii2tech/crontab extension for this:

use yii2tech\crontab\CronJob;
use yii2tech\crontab\CronTab;

$cronJob = new CronJob();
$cronJob->min = '0';
$cronJob->hour = '0';
$cronJob->command = 'php /path/to/project/yii some-cron';

$cronTab = new CronTab();
$cronTab->setJobs([
    $cronJob
]);
$cronTab->apply();

关于yii2-admin的菜单数据表配置

/**
 * Configs
 * Used to configure some values. To set config you can use [[\yii\base\Application::$params]]
 *
 * ```
 * return [
 *
 *     'mdm.admin.configs' => [
 *         'db' => 'customDb',
 *         'menuTable' => '{{%admin_menu}}',
 *         'cache' => [
 *             'class' => 'yii\caching\DbCache',
 *             'db' => ['dsn' => 'sqlite:@runtime/admin-cache.db'],
 *         ],
 *     ]
 * ];
 * ```
 *
 * or use [[\Yii::$container]]
 *
 * ```
 * Yii::$container->set('mdm\admin\components\Configs',[
 *     'db' => 'customDb',
 *     'menuTable' => 'admin_menu',
 * ]);
 * ```